Quantcast
Channel: AM – The SWLing Post
Viewing all 825 articles
Browse latest View live

The SWLing Post 2015-2016 Shortwave Radio Buyer’s Guide

$
0
0

This article originally appeared in the November 2015 issue of The Spectrum Monitor magazine:


FourRadiosAbstract2

Despite the often-expressed view that shortwave may be on the decline, if one were to look at this year’s shortwave technology alone, the truth would seem to be anything but. Remarkably, 2015 has been a great year for the shortwave radio listener, as several models of portables, tabletops, and SDRs have been either introduced or improved.

The following is a basic, easy-to-follow buyer’s guide to some of the best receivers on the market currently. This guide is, by no means, comprehensive; rather, it’s a selection of rigs I have tested, some of which I now own. It builds on the guide I published in the November 2014 issue of TSM, and highlights innovations since that issue, while still acknowledging the contributions of previous models.

Compact/Travel portables

If your budget is tight, or if you’re looking for a radio that could easily slip into your glove compartment, backpack, carry-on, or even jacket pocket, you need to consider a compact shortwave radio.

Typically, there is a performance compromise with compact radios: they don’t always have the sensitivity of their more expensive cousins; they have a more limited frequency range; and they don’t detect single-sideband signals. Nonetheless, the ones listed here are fine performers for their size and price. Entries are listed in alphabetical order.

The Eton Traveller III

The Eton Traveller III

Eton Traveller III

Eton has once again refreshed the design of its popular “Traveller” series of compact receivers: their latest is the third edition, the Eton Traveller III. I’ve owned the past two versions of the Traveller, and having learned to appreciate these, was eager to get my hands on the newest Traveller III. As the name implies, this is a great little radio for the international traveler; it not only has shortwave, AM and FM bands, but it also has a world clock that can easily be switched from the front panel, a useful alarm function, and great built-in speaker. New to the Traveller III is FM RDS: a great way to capture FM station identification when visiting a new city. The key lock is prominent on the front panel and the included padded nylon case is one of the most rugged I’ve seen in years. Performance is what I’ve come to expect from the Traveller series: superb AM (mediumwave) reception, great FM reception, and capable shortwave reception. It lacks the multiple bandwidths found in other similar DSP radios, but my impression is that the default bandwidths are adequate for multi-band listening.

The Eton Traveller III is available from Universal Radio, Amazon.com and more outlets via Eton. Pricing ranges from is $55-60 US.

The C.Crane CC Skywave

The C.Crane CC Skywave

CC Skywave

Only a couple of weeks before the Christmas holiday of 2014, C. Crane introduced a compact portable that truly impressed me: the CC Skywave. The Skywave is as compact as any other ultralight radio, but adds a host of features that has made it an invaluable radio for my one-bag air travels. The CC Skywave covers the following bands: Shortwave, AM, FM, Weather, and Aviation. It’s a comprehensive toolbox of frequency bands and listening modes which only lacks, sadly, SSB.

Ergonomics are excellent for such a small portable. It’s easy to use, as well: I only needed to reference the well-written manual for a few functions. I find the CC Skywave to be very sensitive on shortwave and mediumwave, rivaling radios that cost much more.

One negative I’ve learned through readers of the SWLing Post is that the first production run of the CC Skywave was prone to overload in the presence of strong local broadcast stations. C.Crane have confirmed that this has been addressed in the latest CC Skywave production run and is no longer an issue. To insure you’re receiving a unit from the latest production run, consider purchasing directly through CCrane.

The CC Skywave is sold by Universal Radio, Amazon.com and directly by C.Crane. Price is $89 US.

The CountyComm GP5/SSB

The CountyComm GP5/SSB

CountyComm GP5/SSB (Tecsun PL-365)

CountyComm––a retail distributor of products created primarily for use by the US government––introduced a new shortwave portable late in 2014: the GP5/SSB. The GP5/SSB came about as a result of a large order CountyComm received from a US government department for an “inexpensive, small portable, AM/FM/SW radio with SSB” for emergency supply caches and diplomatic posts. Like its predecessor, the GP5/DSP, the GP5/SSB has a vertical form factor, much like a handy-talky, and a detachable/rotatable ferrite bar antenna that greatly improves AM/mediumwave reception. The GP5 series is limited by a small internal speaker that sounds somewhat tinny; it also lacks a direct entry keypad. Still, with a pair of headphones and some careful memory allocation, the GP5 is a pleasure to use.

If you’re looking for an ultra-portable radio with SSB, then the GP5/SSB is a very good choice. (It may, in fact, be the only ultra-portable SSB choice currently on the market). While the SSB performance can’t compare with larger, pricier receivers, or ham radio transceivers, it’s very good for $80 US. If you’re looking for an emergency communications receiver––something to stash in your vehicle, emergency kit, or bug-out bag––the CountyComm GP5/SSB is a great choice and value. Indeed, that’s who the GP5/SSB was designed for, and why this rig has excellent frequency coverage in all modes, with good sensitivity/selectivity and designed for portable, one-handed operation. In fact, CountyComm has even designed and manufactured (and in the USA!) a robust, protective 1000-Denier case for the GP5/SSB. This case makes it very easy to strap the GP5/SSB to your belt or backpack securely.

The CountyComm GP5/SSB is available from Universal Radio and directly from CountyComm.

The Sangean ATS-405

The Sangean ATS-405

Sangean ATS-405

I was surprised this year when Sangean introduced its latest compact/travel receiver, the ATS-405. I had heard rumors that Sangean may have been leaving the shortwave radio scene, so was pleased to learn that Sangean was not only still invested in the hobby, but innovating. Indeed, the ATS-405 has features that have not yet been included on small DSP-powered portables: specifically, the ability to control squelch, tuning mute, and soft mute.

The ‘405 is a decent little radio with a great deal of functionality and features for a rig in its price class. But overall, its performance seems rather mediocre. If you primarily listen to FM, you’ll be pleased. If you’re a mediumwave listener, you’ll be pleased only if you don’t mind the 800/1600 kHz DSP birdies which plagued both of my review units. If you’re primarily a shortwave listener, you’ll need to carry a clip-on wire antenna to bring the sensitivity up to the level of similarly-priced receivers. I also found performance variations between my two review units; an indication that quality control is somewhat inconsistent at the factory.

The Sangean ATS-405 is available via Universal Radio and Amazon.com. Price is $89 US.

Other compact/travel radios

In the 2014 Buyer’s Guide we included several other compact travel radios worth considering: The [original] Kaito KA1103/Degen DE1103, Tecsun PL-310ET, and the Tecsun PL-380 to name a few.

Full-Featured Portables

In the portables market, I believe you get the most value and quality in the $90-250 price class. Most beginners and seasoned SWLs prefer a radio that includes everything necessary to get on the air immediately; all of these radios provide just that. Straight out of the box, you’ll have everything you need to listen to shortwave bands. All of these recommended radios are designed to pick up major shortwave broadcasters with ease, and offer the following features: good frequency coverage; circuitry that helps in the detection of weaker stations; and with a few notable exceptions, the ability to receive single-sideband.

The Tecsun PL-680

The Tecsun PL-680

Tecsun PL-680

The latest Tecsun full-featured portable––the PL-680––appeared on the market in February this year. Cosmetically, the receiver is nearly identical to the Tecsun PL-600, but with the added features of the Tecsun PL-660. Indeed, in terms of features and comparing them with that of the venerable PL-660, there are no obvious additions on the PL-680. The PL-680 has been improved, however, in its shortwave reception. The PL-680 is both slightly more sensitive and has a more stable AGC (Automatic Gain Control) than the PL-660. If you are primarily a shortwave radio listener and wish to have one of the best sub-$200 receivers currently on the market, the PL-680 may be the rig for you.

On the other hand, if you are primarily a mediumwave DXer and already own the PL-660, you will likely want to pass on the PL-680. The PL-680’s mediumwave reception is simply not as good as that of the PL-660. The PL-660 is both more sensitive and has a lower noise floor on mediumwave.

Note that since its introduction, inventory of the PL-680 has fluctuated; the primary retailer is Anon-Co in Hong Kong and on eBay. Price is $95 US (plus shipping from China).

The Eton Satellit

The Eton Satellit

Eton Satellit

Last year, Eton released the Satellit: a new full-featured portable, essentially replacing the venerable Grundig G3, but carrying the name of the flagship Grundig Satellit series.

The Satellit has many of the same functions as the Grundig G3, and has a near-identical form-factor, but sports a new amber backlit display, multiple bandwidths, and a double-jointed telescopic antenna. The Satellit performs admirably on the AM/mediumwave bands, quite well on the shortwave band but, most notably, performs brilliantly on FM. The audio fidelity from the built-in speaker is quite robust; indeed, it’s among the best in its class. The key layout and ergonomics are similar to the Grundig G3 and G5; meaning, the radio is quite simple to use. One negative is that the Satellit mutes between frequencies while tuning, however, this is minimal in the most recently-updated production runs. I’m very pleased that all of the new Eton radios lack the tactile rubber coating found on some previous models, for while the coating works excellently to improve one’s grip on the radio, over time it can become sticky to the touch (if you find this to be a problem, here are several techniques to clean the sticky residue: http://bit.ly/1KQN8TX).

At time of print, the Satellit is generally available for about $180-190 from a variety of retailers, including Universal Radio and Amazon.com.

Other full-featured portables

In the 2014 Buyer’s Guide, we included several other full-featured radios that are still certainly worth considering: The C. Crane CCRadio-SW, Sangean ATS-909X, Sony ICF-SW7600GR, Tecsun PL-600, Tecsun PL-660, and the Tecsun PL-880.

Hybrid Stand-Alone SDR/Tabletops

While tabletop receivers have started to decline with the advent of SDRs, there are many listeners who still prefer a simple, dedicated, stand-alone high-performance receiver with a good tuning knob and clear display, which is to say, a tabletop receiver. Tabletops are designed to perform best with a resonant external antenna.

The Elad FDM-DUOr

The Elad FDM-DUOr

Elad FDM-DUOr

If you’ve been thinking of purchasing an SDR, but really want a traditional front-panel tabletop receiver, the Elad FDM-DUOr may be for you. I’ve included the FDM-DUOr under the tabletop heading because it is, in fact, a tabletop receiver, with the features of a tabletop such as a front panel, knobs, display, and capability to operate independent of a PC. However, if you choose to hook it to a PC, you unleash a full-fledged SDR and a wide array of features. The FDM-DUOr is built on the same receiver and software as the FDM-S2, one of my favorite sub $1000 SDRs. The FDM-DUOr also sports 10 selectable and customizable filter preselectors and an internal switch box for use with an external transceiver.

At time of print, Elad is seeking FCC approval for the FDM-DUOr in order to distribute these units in the USA. The FDM-DUOr is currently available in Europe via the Elad online store: Price is 899.00 €.

The CommRadio CR-1a

The CommRadio CR-1a

CommRadio CR1-a

US-based manufacturer CommRadio introduced the CR-1 in 2013––an amazingly rugged, portable receiver, and essentially a small tabletop SDR. I’ve used mine in travels and at home; the built-in rechargeable battery will power it for hours, it’s built to a mil-spec standard, and it performs like a champ.

In 2014, CommRadio increased the SDR potential of the CR-1 by updating with a new model: the CR-1a. In 2015, CommRadio continued to add features to the CR-1a through firmware and software upgrades, such as a new Spectrum Viewer SDR application, and 3D-Waterfall for Windows PCs.

CommRadio CR-1a owners only need to update their firmware and download software to use the new feature. The CR-1a is priced at $599.95 US, shipped, and includes a battery through Universal Radio––good value for a quality piece of kit. CommRadio also sells the CR-1a directly through their website.

Other tabletops

In the 2014 Buyer’s Guide, we included several other tabletop radios, including the Alinco DX-R8T and the Icom IC-R75.

SDRs/IF Receivers

If you’re searching for maximum performance for the price, software-defined radios (SDRs) and IF receivers are hard to beat. These small “black box” radios require a computer to unlock performance, none are stand-alone. But while I was never a fan of combining my PC with radio listening, once I starting using an SDR, I never turned back. Now, 90% of the time that I’m on the air, it’s with an SDR. The ease of doing so is incomparable, and the functionality simply incredible.

The Elad FDM-S2

The Elad FDM-S2

Elad FDM-S2 and the new SPF-08 preselector

If you read the Elad FDM-S2 review in the November 2014 issue of TSM you’ll know that this little SDR packs a powerful punch for the price. FDM-S2 performance is uncompromising, comparing favorably to receivers $300-400 more in price. The S2 also provides native DRM decoding; it’s a fine DRM receiver.

Users who live in the vicinity of high-powered AM stations will be pleased to know that Elad has developed an outboard preselector box that pairs with the FDM-S2––the new SPF-08, which covers the amateur radio bands. Elad already has a broadcast band version of the SPF-8 in development. The SPF-08 enclosure is the same size as that of the FDM-S2 and couples with it directly via a port on the back of both units.

Both the Elad FDM-S2 and SPF-08 are available via Elad’s online store: http://ecom.eladit.com/

The SDRplay RSP

The SDRplay RSP

SDRplay RSP

The SDRplay RSP was one of the most pleasant surprises I encountered in the world of software defined receivers this year. I published a review of the RSP in the May 2015 issue of TSM; in short, I was amazed at the performance of this $149 SDR. While it doesn’t have its own proprietary SDR application, it is compatible with some of the most popular free applications on the market: SDR Console, SDR Sharp, and HDSDR to name a few. SDRplay developers are even testing a Raspberry Pi application for the RSP.

Since the time of my review, SDRplay has updated the RSP to include gapless coverage from 100 kHz to 2 GHz––talk about wideband coverage!

If you have been hesitant to invest in a benchmark SDR, or simply want to explore the world of SDRs on a small budget, the SDRplay RSP is a no-brainer. Without a doubt, it packs a lot of performance in a tiny, affordable package. The SDRplay user community is also very active and routinely pushes the boundaries of this little receiver.

The SDRplay RSP is available at SDRplay.com and, in the US, at Ham Radio Outlet.

The RFspace Cloud-IQ

The RFspace Cloud-IQ

RFSpace CloudIQ

The Cloud-IQ is the latest software-defined receiver from the US-based company RFSPACE. The Cloud-IQ offers two modes of operation:

  • the “IQ mode,” which provides 24-bit IQ streaming to your PC over an ethernet cable (much like the RFSpace NetSDR).
  • the stand-alone “cloud mode,” which includes a built-in internet server. In cloud mode, according to RFSpace, “the receiver performs the tuning and demodulation of signals and transmits the demodulated information back to a PC, OS-X, Linux, or Android client anywhere in the world.”

RFSpace is essentially one of the first SDR manufacturers to include built-in SDR streaming functionality, something that has been somewhat complicated to implement in other SDRs.

The price point is also favorable at $629.95 through Ham Radio OutletAmazon, Astroradio and ML&S. Availability has been quite limited this year, but more production runs are planned for the near future. I plan to review the RFSpace CloudIQ in late 2015 or early 2016, as soon as a unit becomes available.

Other SDR/IF receivers

In the 2014 Buyer’s Guide we included several other SDRs and IF receivers worth considering, including the Bonito RadioJet IF-Receiver 1102S, Microtelecom Perseus, and the WinRadio Excalibur. Additionally, note that the affordable Airspy SDR will soon have a new converter to cover HF down to 1kHz–look for a review in 2016.

The Shortwave Radio Index

If you would like to view a comprehensive list of all shortwave radios currently on the market, check out the Shortwave Radio Index (http://swling.com/db).


Best solution to restore a vintage plastic radio chassis?

$
0
0

Sony-ICF550W-FrontFriday, I brought home an untested, slightly grimy, Sony ICF-5500W. I purchased it through Goodwill for $20.

Sony-ICF550W-Right

I crossed my fingers as I put three C cells in the radio and turned it on. Fortunately, I was rewarded with brilliant audio. I tuned the ‘5500W on AM/mediumwave and heard CFZM,  500 miles to my north, and Radio Reloj, 860 miles to my south. A quick scan on the FM dial revealed that I could also hear all of my local benchmarks. Whew!

Other than the dial needing a little calibration, and DeOxit on a few pots, it’s in excellent mechanical shape.

Sony-ICF550W-Left

I started cleaning the radio last night using Q-tip cotton swabs and a vinegar/water solution.

I’d like to restore the hard plastic chassis’ original shine, though.

I was tempted to reach for some Armor All, but stopped myself short. I know it would give the ICF-5500W a nice shine, but would it cause any long-term damage to the black plastic or clear dial cover?

I know there are vintage radio restorers among the SWLing Post readership. Can someone offer advice on what’s the best product to use (or not use!) on my ICF-5500W?

If you have experience, please comment!

Jay reviews the Panasonic RF-2400 AM/FM radio

$
0
0

Panasonic-RF-2400Many thanks to SWLing Post contributor, Ron, who shares this review of the Panasonic RF-2400 by Jay Allen.

Jay begins his review:

Definitely a no-frills set the Panasonic RF-2400 is a basic AM/FM portable radio with a pleasing retro look and a large slide rule tuning dial. At a street price generally below $31 it offers good utility where maximum performance is not needed nor expected. The fact that it has a built-in AC power supply (no external wall wart needed) means it will be perfect for a desk or kitchen counter where it can operate for long hours without draining its batteries. However, being a totally analog design, it sips power from its batteries and will give many hours from a set of 4 AA alkaline batteries unless it is played very loudly which will consume the batteries faster.[…]

Click here to continue reading on Jay Allen’s website…

Historic Ocean Gate antenna field may be removed

$
0
0

GoodLuckPointMany thanks to SWLing Post contributor, Ulis K3LU, for sharing the following story from newsworks.org:

Pole removal project planned for Good Luck Point tidal marshlands

The iconic poles emerging from the tidal marshes in Bayville’s Good Luck Point may soon disappear if a federal plan clears a historic preservation hurdle.

A plan funded by the federal Disaster Relief Appropriations Act of 2013 calls for the removal of hundreds of poles along with cables, wires, metal towers, and concrete blocks that sit within Barnegat Bay marshlands at the foot of the Toms River.

“The goal of this action is to enhance coastal marsh habitats by increasing marsh resiliency from impacts of large storm events and other ecosystem stressors,” according to a U.S. Fish & Wildlife Service release.

The poles are a component of inactive shortwave antenna fields associated with AT&T’s ship-to-shore shortwave communications system, which was in operation at the sites from the early 1930s until 1999, according to the release.

The area also includes a shortwave transmitter building and antenna field. Under the call sign “WOO,” the station helped broadcast Voice of America around the globe after 1944 and enabled communication with ships at sea throughout the twentieth century.

Click here to continue reading…

The article also noted this excellent video–an aerial view of Good Luck Point:

For more information about the Good Luck Point site and its history, check out this website and this article from Wavescan.

Phil’s initial impressions of the Degen DE27

$
0
0

Degen-DE27

Many thanks to SWLing Post reader, Phil Ireland, who comments:

I’ve just received my Degen DE27 from China. Interesting little radio, I haven’t had a good chance to put it through its paces yet but my initial impressions are the radio seems well built and fairly intuitive to turn it on.

However, all the instructions are in Chinese so luckily there was someone in my office who could set the language to english otherwise, setting up the radio is a nightmare! I will have to take the radio outside to test its performance as the office environment is useless to listen in.

The box says the radio tunes from 3.2 mhz to 21.850 mhz however, I havent been able to work out how to make it tune out of the standard SW Broadcast Bands yet. Toggling between 10 khz and 9 khz steps for AM is easy as it setting the FM band coverage but I’m yet to determine the SW settings. It appears tuning is only in 5 khz as well on SW.

As for venturing into MP3 settings and recording, I’ll leave that, it seems too much of a challenge! The clock and calendar, sleep timer, alarms are all fairly straight forward but there is an “E-Book” setting which defies description! It has a USB flash disc function and inputs for a micro SD card. Charging the supplied Lithium battery is via a supplied USB cable.

The display is easy to read and attractive with excellent backlighting. I’m not expecting stellar performance on any band, after all, it was a cheap radio (about 40 AUD with free postage) but it is built around DSP architecture. Only a single bandwidth is available and there is no SSB capabilities. The radio hopefully will be ideal to throw onto a backpack or pocket as a travel portable.

If DEGEN read these comments, perhaps an English manual put online would be extremely helpful to allow users to get the most out of the DE27.

I’ll comment more on the performance later but for now, the radio shows promise.

Thanks so much for sharing your initial impressions, Phil! Please keep us informed as you discover more about this little radio!

This reminds me that I have yet to put my Degen DE221 through the paces. Stay tuned!

Fessenden Christmas Eve Commemorative Transmissions

$
0
0

Embedded image permalink

This  was reported in the ARRL Newsletter:

Brian Justin, WA1ZMS, will again put his 600 meter Experimental Station WG2XFQ on the air on for a Christmas Eve commemorative transmission. WG2XFQ will transmit on 486 kHz from Forest, Virginia, to mark the 109th anniversary of Reginald Fessenden’s first audio transmission. Historic accounts say Fessenden played the violin — or a recording — and read a brief Bible verse. It’s been reported that other radio experimenters and shipboard operators who heard Fessenden’s broadcast were astounded.

Justin will conduct a run-up to this year’s event starting at around mid-day Eastern Time on December 23. The “official” Christmas event will begin on December 24 at 0001 UTC (the evening of December 23 in US time zones) and will continue for at least 24 hours. Justin said he plans to repeat the commemorative transmissions on New Year’s Eve and on New Year’s Day.

Fessenden’s transmitter was an ac alternator, modulated by placing carbon microphones in series with the antenna feed line. Justin’s homebuilt station is slightly more modern, based on a 1921 vacuum tube master oscillator power amplifier (MOPA) design. Listener reports are appreciated and may be sent directly to Brian Justin, WA1ZMS, at his QRZ.com address. (Brian Justin, WA1ZMS, built this replica circa-1920 transmitter, capable of CW and Heising modulated AM.      Photo by Brian Justin)

While I have not heard Brian’s transmission before, I have actually heard a transmission on the experimental frequencies between 465 – 515 kHz. I never expected to be able to hear anything due to extremely high local noise, but one night the propagation gods smiled upon me and the evening was exceptionally quiet. I listened on my Elad SDR receiver over and over to the Morse Code signal which was extremely weak, but mostly readable. I confirmed with Multipsk software, verifying I was indeed hearing one of the experimental stations out of Connecticut.

For information regarding the 500 KC experimental project you can follow this link.

Why not give a listen? You just might be surprised like I was to hear something on this band, and you could add a little Christmas Eve radio memory to your collection!!             73, Robert

Robert Gulley, AK3Q, is the author of this post and a regular contributor to the SWLing Post. Robert also blogs at All Things Radio.

Alcaravan Radio Christmas QSL

$
0
0

Many thanks to Rafael Rodríguez R., QSL Manager for Alcaravan Radio, for sharing this Christmas QSL Card:Alcaravan Radio QSL Card Christmas

Ukraine to launch radio station for troops

$
0
0

Disputed Ukraine Map via Wikimedia CommonsMany thanks to SWLing Post reader, David Iurescia (LW4DAF), who shares this article via Sputnik News:

Ukraine plans to launch a new radio station for the military in 2016.

Alexei Makukhin, an advisor to the Ukraine’s Defense Minister, said during a press briefing that a new Ukrainian radio station for military personnel will begin operating on March 1, 2016.

“It’s no secret that our troops on the frontline often suffer from an information vacuum,” Makukhin said. “So we need a radio station. Seventy percent of its content will be music; there will also be news broadcasts and programs for the troops – where soldiers can say hello to their friends and relatives, request songs and share stories live on air.

There will also be programs featuring interviews with experts and military personnel.”

The new radio station will be reportedly funded by Spirit of America, a non-profit company which assists US military personnel deployed in Iraq, Afghanistan and Africa.

Continue reading on the Sputnik News website…


Radio France to shut down mediumwave

$
0
0
La Masion de la Radio, Paris, France, (Photo source: Gérard Ducher via Wikimedia Commons).

La Masion de la Radio, Paris, France, (Photo source: Gérard Ducher via Wikimedia Commons).

Many thanks to SWLing Post reader, Marc, who shares this news from Radio France.

The article (in French) notes that as of midnight on December 31, 2015, Radio France will cease all mediumwave broadcasts permanently. Up to this point, Radio France’s mediumwave transmitters have broadcast France InfoFrance bleu RCFM and France Bleu Elsass.

The article notes that regions previously within the broadcast footprint of their mediumwave transmissions are now serviced via FM and/or online streaming.

Click here to read the article on Radio France’s website.

Mediumwave: France, Luxembourg and Germany go silent

$
0
0

france-germany

On Facebook, Mike Terry reminded me:

“Tomorrow France, Germany and Luxembourg go very quiet on medium wave.”

He’s right–there will be more empty space on the AM broadcast band for those living in or near France, Germany or Luxembourg.

I hope there are Post readers out there who might be able to make recordings of some of these stations as they go off the air.  I would like to add those recordings to the archive. Please comment or contact me if you can.

Ayar notes LW and MW transmitters still active in France

$
0
0

AM-Dial-Digital-Grundig-Mediumwave-MWIn response to our previous post about France, Germany and Luxembourg leaving the AM broadcast bands, SWLing Post contributor Ayar (HB9EVW) comments:

It is indeed a sad day for AM broadcasting. Not only Germany, France and Luxembourg, also the Czech Republic will turn off 3 MW transmitters on January 5th 2016. The three transmitters carrying the CRo Plus program are: 639, 954 and 1332 kHz.

[In the Czech Republic, there] are 2 transmitters on 693 kHz, the bigger one in “Liblice” with 750 kW will be switched off, but the smaller one in “Ostrava-Svinov” with 30 kW will remain active for now, or at least until the FM coverage is good enough for this region.

In France (including Monaco), there will still be few active LW and MW stations:

162 KHz. Allouis (France Inter)
216 KHz. Roumoules (RMC)
1467 KHz. Roumoules (TWR)
1467 KHz. Col de la Madone (Radio Maria France)
1593 KHz. St Goueno (Bretagne 5)

I am already recording some of the transmitters from Germany and France. I can receive few of them here in Switzerland even during the day.

Many thanks, Ayar. I would love to share some of your recordings on the SRAA.

Sangean DT-500W: a new AM / FM / Weather Alert Pocket Radio

$
0
0

Sangean-DT-500W-Front

Many thanks to my pal, Jeff McMahon from The Herculodge, who has just apprised me of a new Sangean AM/FM/WX portable: the DT-500W. Jeff learned about the new pocket radio via a comment on his blog.

DT-500W-SideIt appears the DT-500W is powered by a rechargeable Li-ion Polymer 3.7V (1850mAh) battery. I would expect good longevity from a full charge.

Based on the specifications, the receiver covers all NOAA weather radio frequencies, the FM broadcast band (87.5 – 108 MHz) and the full AM broadcast band (520 – 1710 kHz). I also noted on the spec sheet, however, that the AM broadcast (mediumwave) band is limited to 10 kHz tuning steps. Not a great contender for the ultralight DXer or someone who travels outside North America if so!

Click here to view the Sangean DT-500W on Sangean’s website.

As of posting, I can’t find the DT-500W listed with any online retailers.

Thanks again for the tip, Jeff!

Norway DXer tunes into CBC Saskatchewan

$
0
0

SX-99-Dial-Nar

Many thanks to my pal, Sheldon Harvey (of the International Radio Report and CIDX), for sharing this news item from the CBC News in Saskatchewan:

Ole Forr is a 58-year-old radio lover who tunes into radio stations across the world for fun

A dairy farmer in Norway went to great lengths to tune into CBC Saskatchewan.

Sure, The Morning Edition with Sheila Coles is the No. 1 morning radio show in Saskatchewan. But few people could have expected it to reach a group of listeners more than 5,800 kilometres away— and not through the internet.

Ole Forr doesn’t let thousands of kilometres and the Atlantic Ocean get in the way of his hobby.

[…]Every late October, Forr and three friends visit a remote location in northern Norway, where he said they spend up to two weeks listening to radio broadcasts using some very long-range receiving antennas.

On Oct. 27, 2015, Forr tuned into CBK 540 AM from Andøya, Norway.

“It’s very remote, so there is no man-made noise,” Forr said. “From October to March, it’s very dark up there so to have dark between the transmitter and the receiver.”

Forr contacted CBC Saskatchewan to verify his recording, providing MP3 evidence of the broadcast.[…]

Read the full article, along with audio, on the CBC News Saskatchewan website.

Thanks again, Sheldon! I love stories like this that give our radio hobby a little time in the limelight!

Recordings of final mediumwave broadcasts from Luxembourg, France and Germany

$
0
0

AM-Dial-Digital-Grundig-Mediumwave-MWMany thanks to several of you who recorded the final sign-ons and sign-offs of several European broadcasters who pulled the plug on mediumwave transmissions this past weekend.

SRAA contributor, Richard Langley, recorded the following broadcasts and posted them to our Shortwave Radio Audio Archive. Click on the following links for recordings and Richard’s excellent notes:

Bernhard Albicker of IntervalSignals.org and AM-Tuners also contacted me with links to recordings he made of the following:

Radio Luxembourg (RTL) special broadcast in honor of the former English service:

Notes:

  • 00:00:00 CRI german, no closing announcement
  • 00:07:49 RTL special broadcast: final 2 hours of RTL “Great 208” from Dec., 1991
  • 02:12:12 National Anthem of LUX

Deutschlandfunk DLF final sign-off:

A special thanks to Bernhard for including the following notes from the final DLF broadcast (in German):

  • 01:03 Announcement of closure. This announcement was broadcast before the full hour since the month of November followed by time signal and news.
  • Within the news at 05:05–item about shutdown of Medium Wave “Era of medium wave ends in Germany” followed by weather report at 05:37
  • 46:35 switch from regular programming to interval signal loop
  • 51:57 sign off transmitter Nordkirchen 549kHz
  • 53:13 sign off transmitter Thurnau 549kHz

A high-gain ferrite bar antenna for the PL-360/PL-365 and CountyComm GP5 series

$
0
0

Ferrite-Bar-Antenna-PL-365-GP5SSB

If you own a Tecsun PL-360, PL-365 or a CountyComm GP5/DSP or GP5/SSB, you might take note of this large ferrite bar antenna offered by a Greece-based seller on eBay.

Ferrite-Bar-PL-365

As you can see in the image above, this antenna is substantially larger than the stock MW antenna supplied by the manufacturer. According to the seller, this ferrite bar antenna has a 10 – 25 db gain over the stock external antenna. I imagine its ability to null unwanted signals is also much better.

The price is about $40 US shipped internationally.

Have any SWLing Post readers ordered this antenna? If so, please share your comments/reviews.

Click here to view the antenna on eBay.

SWLing Post reader, David Korchin, also shares the following demo video on YouTube:

Many thanks to SWLing Post readers, Francis Frankenne and David Korchin for the tip!


James reviews the Heathkit Explorer Jr. GR-150 TRF AM radio receiver kit

$
0
0

HeathkitExplorerJr
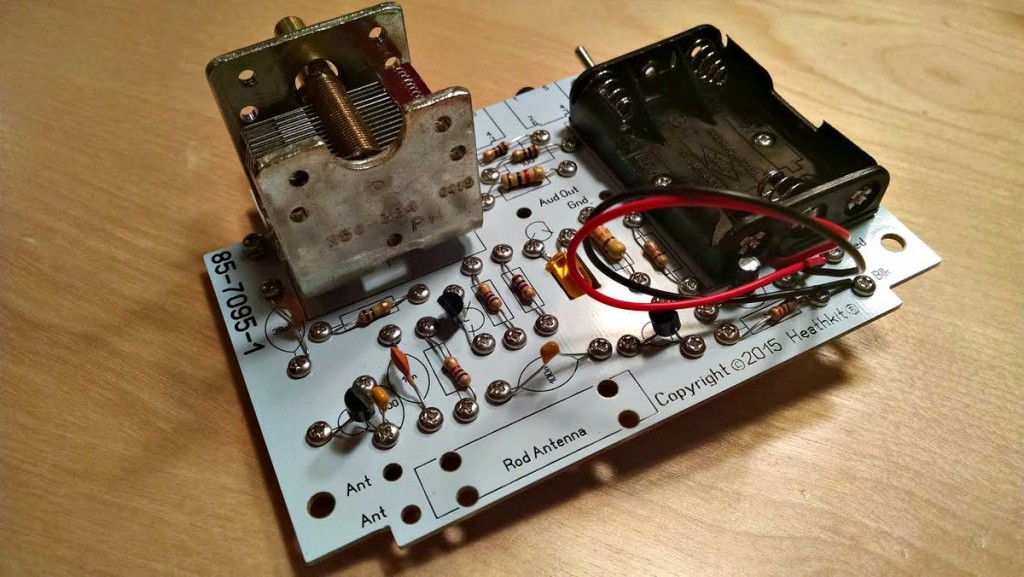
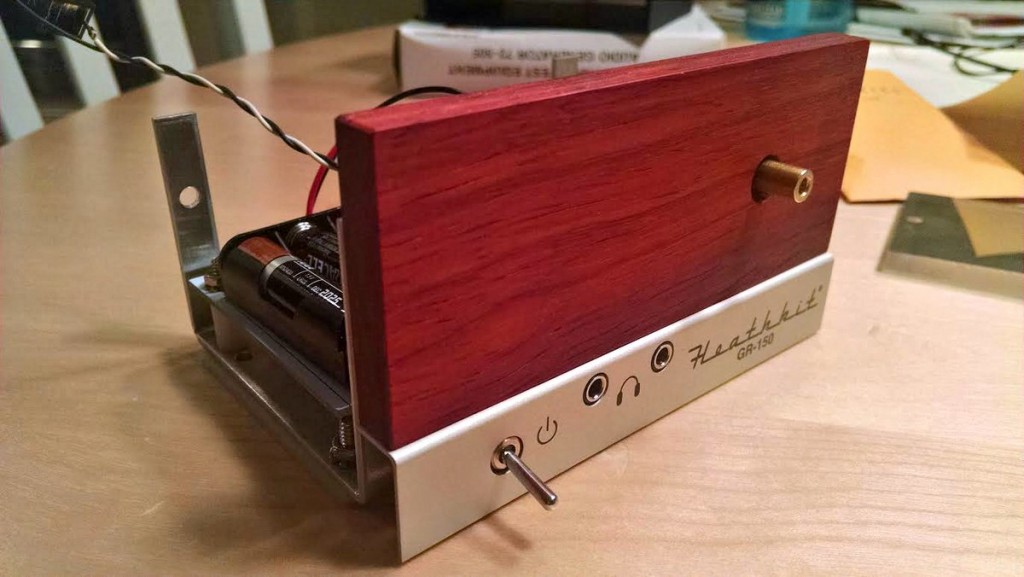
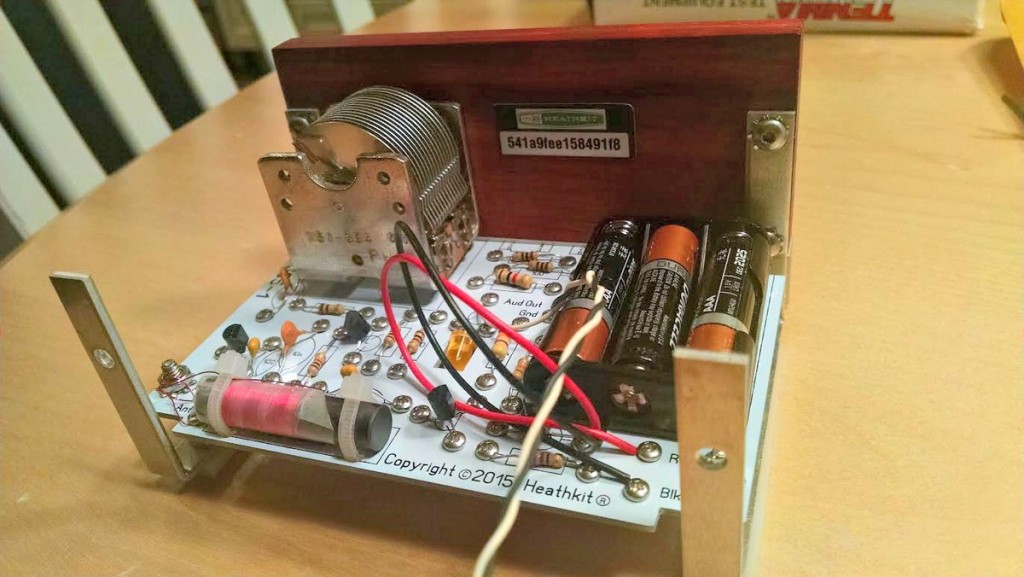
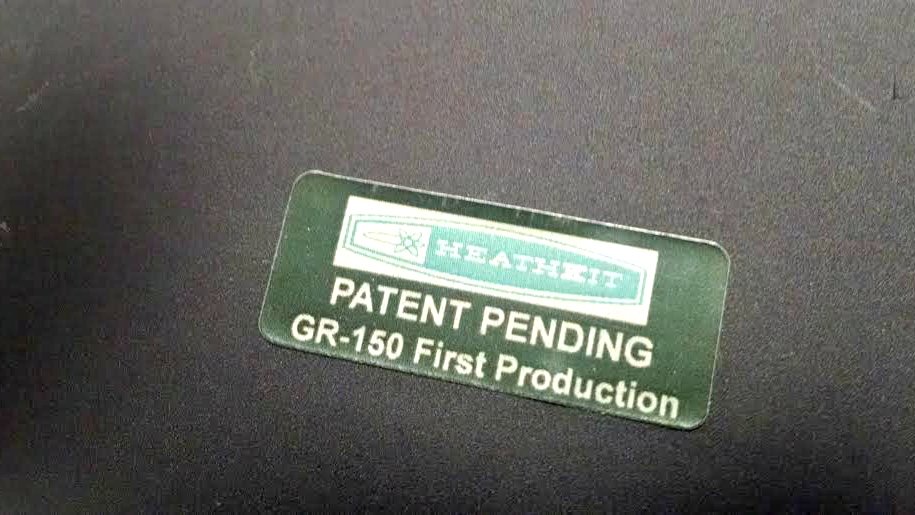
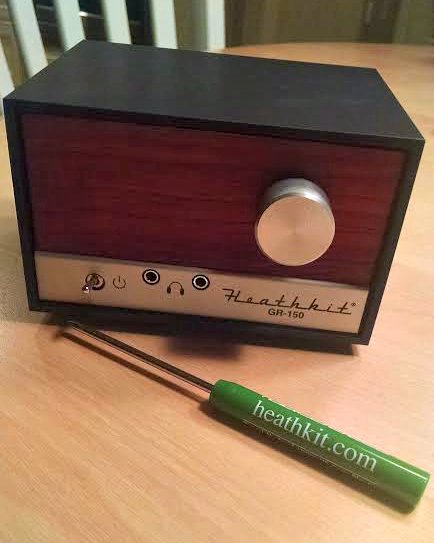
Many thanks to SWLing Post contributor, James Surprenant (AB1DQ), who shares this review and photos of the new Heathkit Explorer Jr. TRF AM radio receiver kit:


 Heathkit Explorer Jr. Review

I received this Heathkit kit for Xmas from dear old Dad.

Heathkit Explorer Jr. Manual

The Explorer Jr. manual is very nicely done, spiral-bound, and very reminiscent of the old Heathkit manuals in terms of lay-out and detail.

Heathkit Explorer Jr. Retro envelope packaging

The packaging of the parts is also reminiscent of the old Heathkits with parts grouped into envelopes by phase, ie. “Active Components,” “Passive Components,” “Small Parts,” “Knobs,” etc.

The first night, I worked through completion of the circuit board attaching all electronic components and stopped at the step for winding the coil. I thought it would make sense to start fresh on that step since winding coils is generally a pain.

Even on the first night, I had a few criticisms:

  • A couple of the envelopes were ripped open when I unpacked the kit. There were nuts, bolts, spacers and an Allen wrench loose in the outer box. That said, no parts were missing.
  • I found two errors in the manual:
    1. The color code for one of the resistors was incorrect in the manual. With my aging eyes, and the miniaturization of components today, I always use an ohm meter to test all resistors before attaching them to the PCB when I build a kit.

      Incorrect color code in manual.

      Incorrect color code in manual.

    2. The circuit contains 10 resistors and all 10 were included in the kit. But one was completely missing from the step-by-step instructions. After I finished attaching all active and passive components, I had one resistor left over and fortunately there was a matching empty space on the circuit board for the same value resistor. I double and triple checked the instruction manual and I can not find where it calls for this resistor to be attached.
  • My biggest criticism so far is the fact that this kit is “solder-less.” All components are attached to the PCB with screws, lock washers and a nut. You insert the leads for each component through the over-size pass-through holes on the PCB, and bend the leads tight against the edge. Then you insert a screw in from the topside, place a lock washer on the bottom side and fasten with a bolt.
Bottom of the PCB board

Bottom of the PCB board

On the upside, the fact I didn’t need to work with a hot solder iron meant I felt comfortable building the kit at the kitchen table. (My XYL would not be pleased if she found burn marks on the table!) So I had a nicer environment to work in than the basement work bench.

Heathkit Explorer Jr. sheered off resistor leads
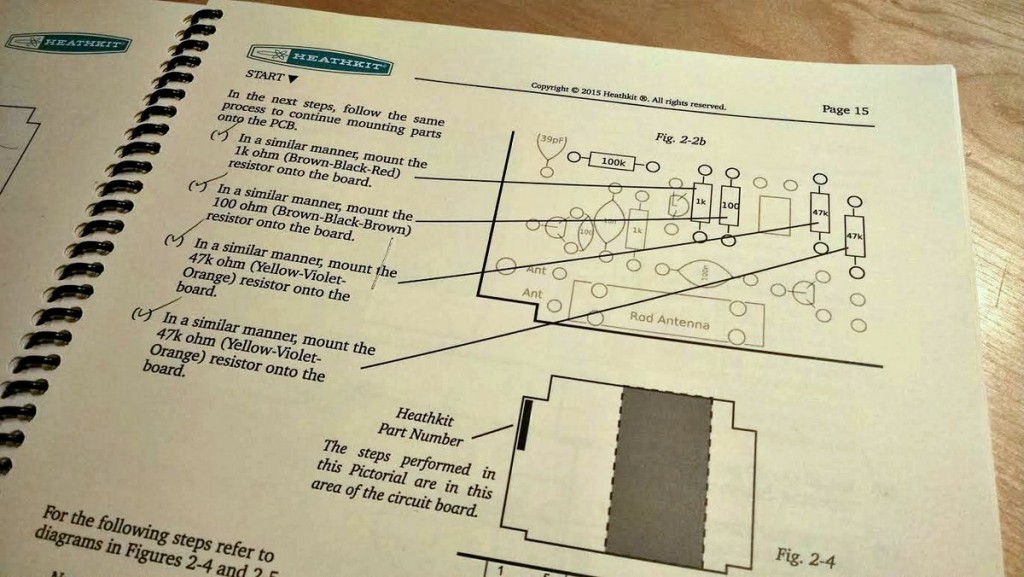
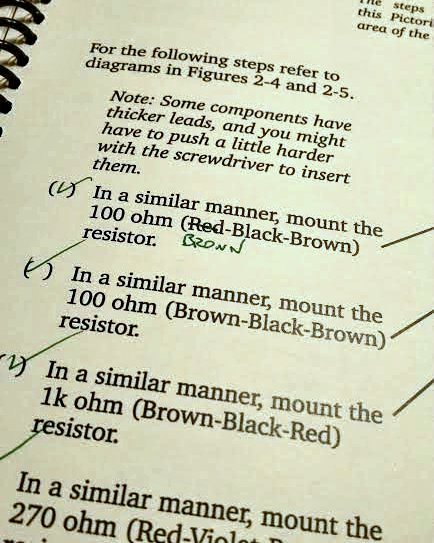
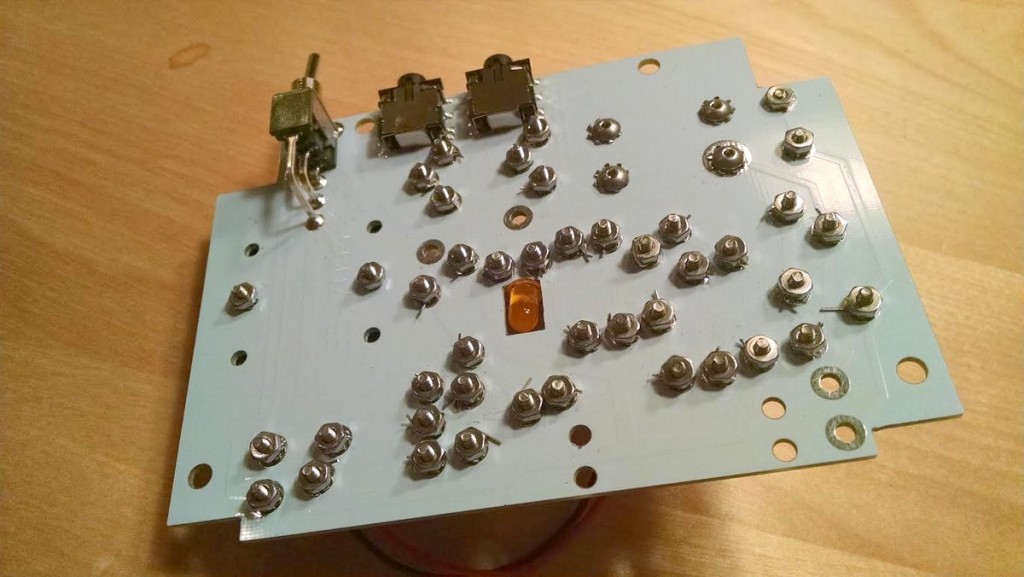
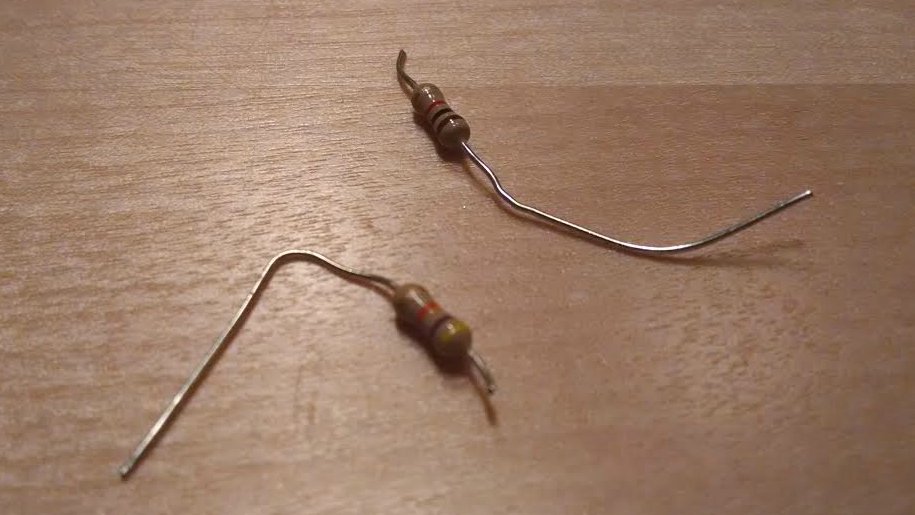
On the downside, I managed to sheer off the leads on TWO resistors when tightening the screws. Fortunately I was able to replace the busted resistors from my on-hand stock.

The other odd thing about this method of attaching components is that Heathkit included a nifty screwdriver in the kit, but leaves it up to the kit builder to provide a small socket wrench or pliers to hold the nut in place while tightening the screw.

Finally, the instructions call for the kit builder to ‘bend the excess leads back and forth’ until they snap off, rather than instructing the kit builder to snip off the excess leads with nippers. That seemed really strange to me.

Heathkit Explorer Jr. Completed coil

I completed my build of the GR-150 Explorer TRF radio this past weekend. I had no difficulty winding the coil, which involved 56 turns of magnet wire around a ferite core and securing it with transparent tape.

Heathkit provided the black ties, which were too large.

Heathkit provided the black ties, which were too large.

The next problem I encountered was attaching the wound coil to the PCB. The kit came with two zip cords to use as fasteners, but the zip cords were much much too large to fit through the holes drilled in the PCB. So this required a trip to the hardware store.

You can clearly see that the holes are too small for the black cable ties.

You can clearly see that the holes are too small for the black cable ties.

Once I had the coil mounted, I encountered the problem again with the bolts and nuts shearing off the leads – this time, it took me about 4 tries to attach the thin fragile coil wires to the PCB. It’s a very fragile process that again had me wishing this was a solder kit.

Heathkit Explorer Jr. Top of PCB front

The rest of the assembly went well. The only other glitch I encountered was in assembling the cabinet, the kit came with six locking star washers for the cabinet, in fact the parts list indicates that six should have been included in the kit. But then the actual assembly called for 10 star washers.

Heathkit Explorer Jr. Top of PCB

Heathkit Explorer Jr. Nearly finished frontHeathkit Explorer Jr. Completed PCB mounted

So, how did the radio perform? About as expected. It is a single stage TRF receiver without a proper audio amplifier. The instructions say you should use earbuds to listen to the radio, but I found that my standard stereo earbuds to be off too low an impedance for while the radio worked, all stations heard were very faint – about as strong as you’d hear from a typical crystal radio kit.

Heathkit Explorer Jr. 1st run sticker

I hooked the radio up to a set of PC speakers which helped – a lot. Once I could hear the audio output, I was very pleased with the radio’s performance. The tuning cap is geared and it takes a good five turns of the tuning knob to cover the entire broadcast band. The radio was fairly sensitive and not too selective – again, as you’d expect.

So, was it worth it? For me, sure… but it depends on what you are looking for.

It’s a bit pricey for what you get, but if you want to support Heathkit as it attempts to rise from the ashes, and if you have the $$$ to ‘donate’ towards the cause, it may be worth it.

Heathkit Explorer Jr. Completed w. screwdriver

Here is my take:

The good

  • Very nice quality materials….the PCB, tuning cap, and cabinet were of a quality you don’t often see in kits.
  • Nostalgia factor–from the packing to the manuals, the kit really does capture some of the Heath nostalgia.
  • Level of detail in the step-by-step instructions.
  • Documentation. The manual ends with a very nice feature on radio theory and theory of the different stages of the TRF and how to read a schematic. It’s clearly written for a youngster as it’s complete with drawings of smiley-faced electrons moving through the components and circuits.
  • The radio does work and is a joy to tune across the dial.

The bad

  • Quality control is lacking. It’s hard to imagine a kit ever leaving Benton Harbor back in the day with such glaring errors in the manual (wrong color code, missing steps), or with the wrong size zip ties, etc.
  • Price. Even though the materials are high-end, the retail price seems a bit high.

The ugly

  • I really wish Heathkit had included either a built in audio amp circuit (there is plenty of room in the cabinet to add a simple IC-based amp), or would have marketed a separate audio amp kit. Having an amplified speaker would add a lot in terms of pleasure from the completed kit. Another kit vendor, Peebles Originals, peeblesoriginals.com, sells a nice little audio amplifier kit for use with their regen radio kits. I’ve built it, and it’s a simple straight forward kit. Heathkit could have done this and it would have made a big difference. (I think I’ll try my Peebles amp with the Explorer!)

Overall, I really enjoyed the build and I like the radio. I’m looking forward to see what the ‘new” Heathkit does next.

I applaud Heathkit for making a go at a come-back and will continue to support their efforts by buying and building their pricey stuff – yeah, I’m that guy.

73 de AB1DQ
James


James, thank you for not only sharing your experience–along with errors and omissions–but providing excellent, detailed photos. I can’t tell you how many times I’ve been confused by kit instructions and turned to Google to help me find photos and notes from other builders. Your details will help others attempting to build the Heathkit GR-150.

I hope you enjoy your new Heathkit! You’ll have to let us know how that Peebles powered speaker works with the G-150!

Netherlands: proposal to open mediumwave band to low-power stations

$
0
0

AM-Dial-Digital-Grundig-Mediumwave-MW

(Source: Mike Terry via Medium Wave Circle FB Group)

Ydun’s Medium Wave Info
By Marcel Rommerts
12 January 2016

After switching off a number of high power transmitters in 2015, at the end of December the Dutch government has launched a public consultation on ‘opening up’ the medium waveband for radio and non-radio applications with ‘low power’ and with limited government regulation.

When referring to ‘low power’ this means both a power in the range of 1 – 5 watts (site coverage) and 50 – 100 watts (municipal coverage). The idea is that the same frequencies will be re-used across the country. They will be handed out on the basis of a first-come, first served basis. Deadline for comments is 14 February 2016.

http://mediumwave.info/news.html

DX Fiend: Gary DeBock’s guide to building the ultimate FSL antenna for the Tecsun PL-380

$
0
0

Tecsun-PL-380-FSL-1

SWLing Post contributor, Gary DeBock, is an acclaimed innovator in the realm of Ultralight DXing–he’s well-known for constantly pushing the envelop on these inexpensive DX receivers.

This time, Gary has published a detailed home-brew project that can turn your stock Tecsun PL-380 into a Mediumwave DX Fiend!

In Gary’s own words:

This is the “Science Fiction PL-380” model, with the hobby’s first hard-wired FSL antenna in a portable configuration. The radio’s internal Si4734 DSP chip tunes the high sensitivity MW antenna, so there is no need to peak a variable capacitor. For those who can build or obtain this model, it will be a happy new year indeed!

Many thanks to Gary for the following guest post:


3 Inch FSL Tecsun PL-380 Model

Compact Breakthrough in MW Sensitivity, Selectivity and Portability

By Gary DeBock, Puyallup, WA, USA
January 2016

Tecsun-PL-380-FSL-1

Introduction  

Portable radio enthusiasts were astonished when Silicon Labs first introduced their innovative Si4734 DSP chip in 2009—the pocket radios empowered by this new component had amazing DSP-enhanced selectivity. Although the relatively lame stock loopsticks designed by the Kchibo and Tecsun companies seriously limited MW sensitivity there was no shortage of fanatical hobbyists designing upgrade loopsticks in an effort to correct this deficiency. The 7.5” loopstick transplant boosted the MW sensitivity of the PL-380 model up to a much improved level, and it became the most popular modification in our Ultralight radio group.  But in 2011 another huge breakthrough was about to capture the fascination of our DXing niche group—Graham Maynard published his original Ferrite Sleeve article, and the innovative antenna’s sensitivity made our humble pockets radios perform like real transoceanic DXing contenders. This was very thrilling—but was there any possible way that the awesome selectivity from the Si4734 DSP chip and the awesome sensitivity provided by the FSL antenna could somehow be combined in a self-contained breakthrough portable, with lightweight portability as an added bonus?

Tecsun-PL-380-FSL-2

The fact that an Si4734 DSP chip could successfully tune an external antenna was demonstrated by various experimenters (including me) in 2011—a hard-wired 3” Longwave FSL design worked quite well for me in early 2011, and although it was far too heavy to consider attachment to the PL-380 the validity of the hard-wired FSL concept was proven to my satisfaction (see photo at right). The challenge has always been to create a hard-wired FSL that would offer both high MW sensitivity and lightweight portability— a value tradeoff that made this project especially intriguing.

After testing various designs I finally settled on a 3” FSL composed of the lightweight Russian surplus 100mm x 20mm x 3mm ferrite bars. These bars provide a unique balance of high sensitivity and lightweight portability, and the cylindrical shape of the FSL apparently provides the fringe benefit of exceptional nulling capability. The PL-380’s Si4734 chip easily tunes the antenna for breakthrough MW sensitivity from 521-1701 kHz, and provides excellent 1 kHz DSP selectivity as well. The weight of the FSL-enhanced PL-380 is within reason to maintain the concept of easy portability, and its modest size may actually convince airport security agents that it is indeed a radio and antenna combination. Overall the project has been a very satisfying effort to combine the awesome capabilities of both the Si4734 DSP chip and the new FSL antenna– resulting in a breakthrough “travel portable” with astonishing MW-DXing performance.

Project Overview  

This modification procedure will convert the Tecsun PL-380 AM-LW-FM-SW portable from a modest-performing Medium Wave receiver into an exceptional one, with a significant enhancement of Longwave performance as well. The process involves some close-order soldering on a crowded PL-380 circuit board, and should only be attempted by those will good close up eyesight, steady hand coordination and some soldering experience. Certain component parts (such as the 100mm x 20mm x 3mm ferrite bars, the 2.25” Funnoodle inner cores and the orange plastic antenna frames) may be in short supply depending upon current demand, and it is recommended that all these collected prior to starting the project.

Since major portions of this project involve duplication of procedures contained in the PL-380 7.5” Loopstick Transplant article, reference is made to various steps and instructions in that article (posted at

http://www.mediafire.com/view/du3sr5cd9thqvau/7.5inch-LS-PL380.doc ). As such, hobbyists who have successfully completed the 7.5” loopstick transplant project on a PL-380 will find this procedure relatively simple, with only the 3” Bar FSL construction as a new challenge. The resulting FSL-enhanced PL-380 truly provides a quantum leap in MW-DXing performance over the stock model, but reasonable care is necessary to protect the modified portable from sudden drops or mechanical shocks. Completion of the finished radio should provide a great level of satisfaction and hobby enjoyment, especially during travel opportunities where external antennas are impractical or forbidden.

Tecsun-PL-380-FSL-3

Construction Parts Required

A) Tecsun PL-380 AM-LW-FM-SW Receiver (available from many sources, including this eBay listing at $46.99 with free shipping to the USA)  http://www.ebay.com/itm/Tecsun-PL380-DSP-AM-FM-Shortwave-LW-PLL-Radio-Receiver-PL-380-/251783558999?hash=item3a9f783757:g:t0EAAOxylpNTTan7

B) 37 feet of 250/46 Litz wire  http://www.ebay.com/itm/Litz-wire-250-46-0-04-mm-for-crystal-radio-coil-Loop-antenna-100-/160804560511?hash=item2570b2de7f:m:m9fkDfLaAd59_UEmrp1po5w

C) 8 Russian surplus 100mm x 20mm x 3mm ferrite bars (availability currently uncertain– author has a limited supply. An eBay source may reappear for future orders, since many of these bars are presumably still in eastern Europe)

D) 4″ length of 2″ diameter Fun Noodle inner foam core

http://www.amazon.com/Aqua-World-223-Fun-Noodle/dp/B0017QABEQ/

E) Precut orange plastic antenna frame (cut from Ace hardware 48″ plastic level, with 5″ long bottom dimension and 4.5″ top dimension– cutting instructions to follow). NOTE: each Ace Hardware 48” level has enough material to make two FSL antenna frames.

F) Rite Aid 1″ wide waterproof tape (1 roll)

G) Scotch “Extreme” shipping tape (1 roll)

H) Tube of Duro Super Glue (or equivalent), .07 ounce

I) 6 inches of 1/16″ diameter shrink tubing

J) Two 18″ lengths of 125 lb. test plastic tie wraps

K) Two 16″ lengths of 75 lb. test plastic tie wraps

L) Oatey foam pack (4” wide)

M) Two 3/4″ x 1″ strips of 1″ I.D. rubber heater hose

Miscellaneous: Solder, 25w (low heat) soldering iron, hacksaw (or power miter saw), screwdriver set, sandpaper (optional)

PL-380 Preparation

Before voiding the warranty on your new PL-380, it’s a good idea to ensure that it has no existing problems which might require warranty service. (Ha!)

Install batteries in the radio and give it a test run on all four bands, checking the tuning encoder, clock, volume control, speaker, headphone jack, display functions and digital searching modes. Make sure that the radio is working properly in all functions before starting the modification procedure, since the eBay sellers are unlikely to show you any sympathy after you tear out the stock loopstick. It’s also a good idea to check out the Medium Wave weak signal reception with the PL-380 stock loopstick before starting the modification, to establish a benchmark of performance against which the new 3” FSL’s DXing performance will be compared.

Tecsun-PL-380-FSL-4

STEP-BY-STEP CONSTRUCTION

1) Follow the detailed cutting procedures in steps 1-9 of the loopstick transplant article (using either a power miter saw or hacksaw) to prepare the FSL antenna mounting frame, HOWEVER please note that the top section length for this project is 4 ½” (114 mm), NOT 8” as in the loopstick transplant project. The finished precut frame should resemble the picture above, with the top section flat, and the bottom section back edge trimmed to allow full use of the radio’s whip antenna. The frame’s entire bottom section (including the glue surface) is identical in both the loopstick and FSL transplant projects.

2) Follow the detailed procedures in steps 17-22 of the loopstick transplant article to prepare the PL-380 cabinet for the FSL transplant procedure.
Click to enlarge
3) Refer to the photo above. Place the prepared PL-380 cabinet in the vertical position as shown, with a paper roll (or other item) to keep the cabinet in the vertical position. If necessary sand the edges (only) of the antenna frame’s glue surface to ensure that no cutting debris or rough edges will cause an uneven gluing surface. Use a clean, damp cloth or paper towel to remove all dust and debris from both the antenna frame and PL-380 glue surfaces, then wipe them thoroughly dry. Ensure that maximum light shines on the PL-380’s top glue surface (as shown in the photo below), then practice making multiple “dry runs” of placing the antenna frame directly centered on the PL-380’s front top cabinet surface, with its front edge lined up with the PL-380’s beveled front edge. You will only get one chance to place the frame accurately when the super glue is on the PL-380 surface, so make sure that you know exactly what to do! The antenna frame should sit completely flat against the PL-380 cabinet, and slide across it smoothly if such a test is made. If not, sand any rough edges on the antenna frame’s glue surface and repeat the cleaning procedure.<

Tecsun-PL-380-FSL-6
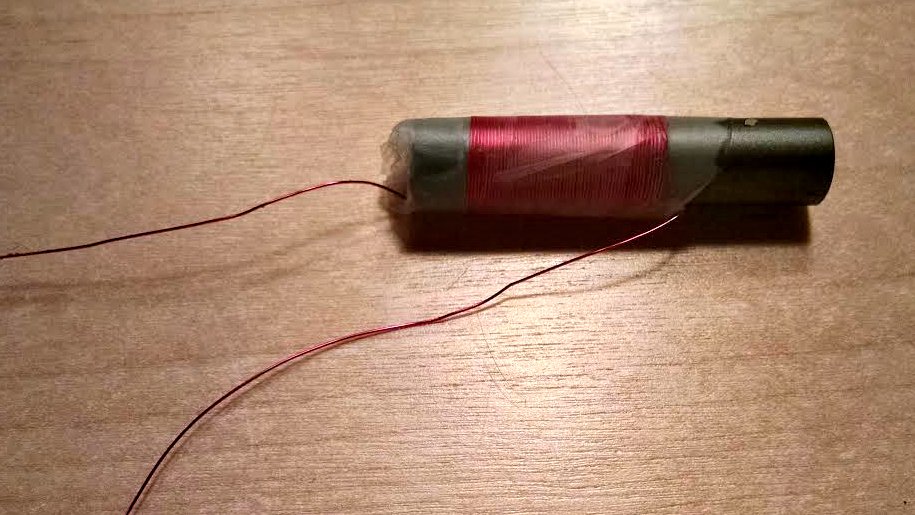
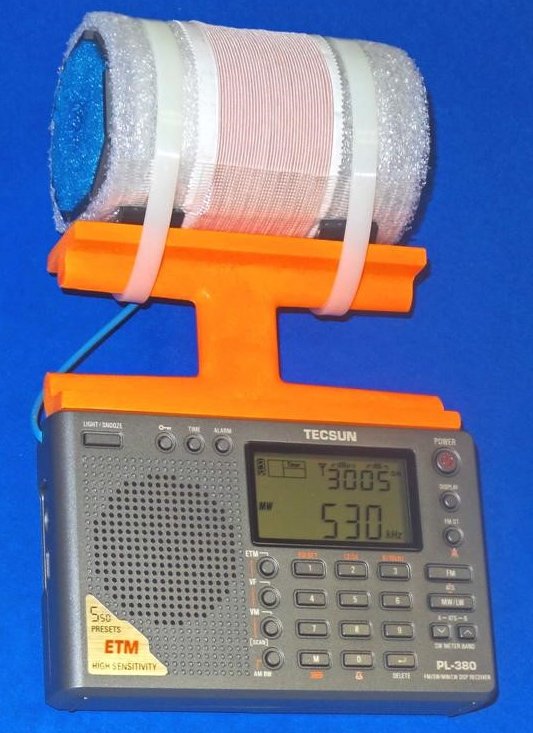
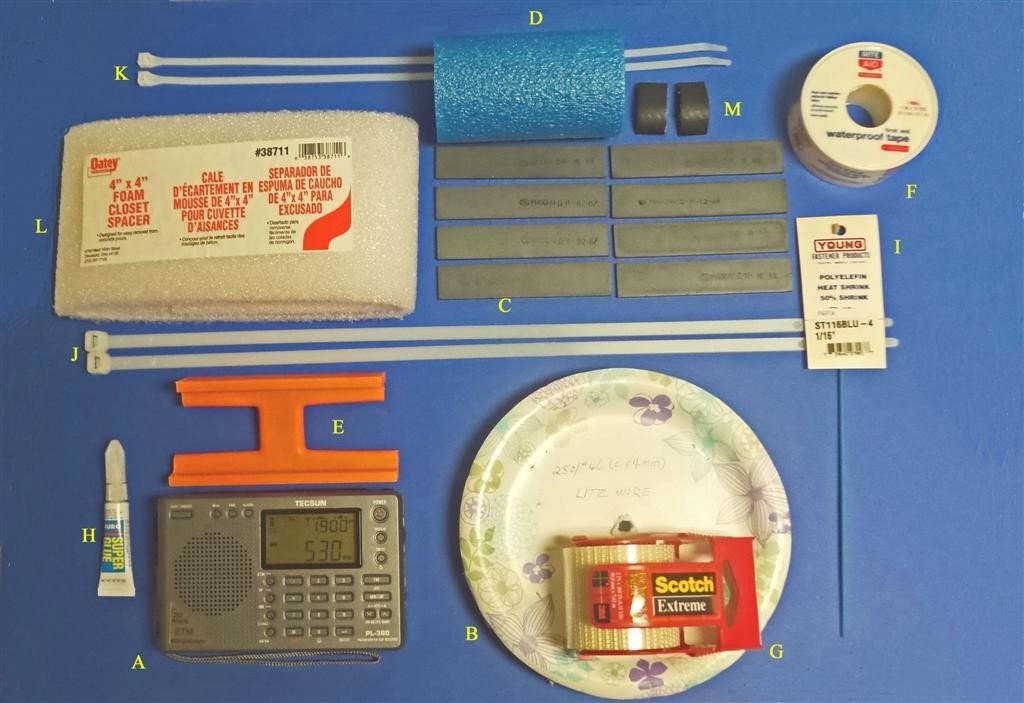
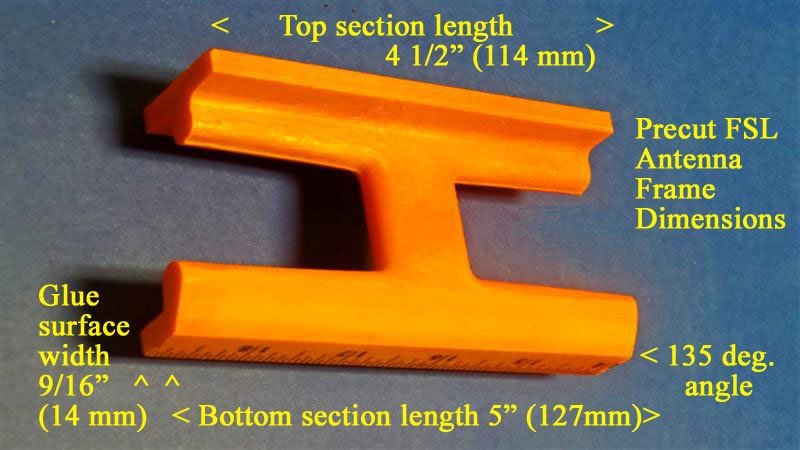
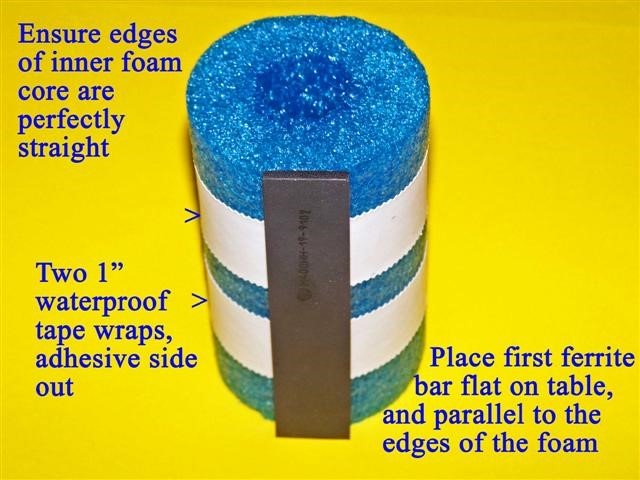
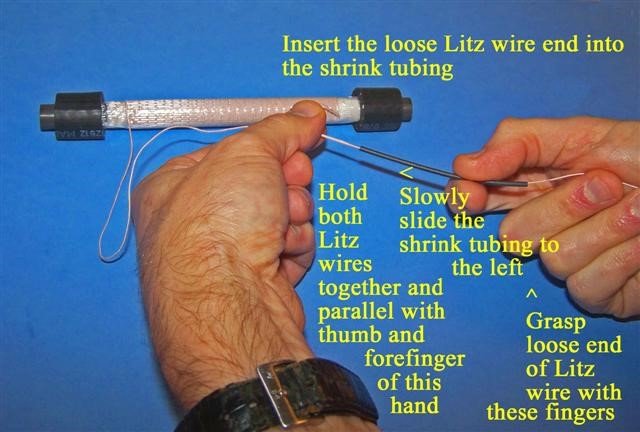
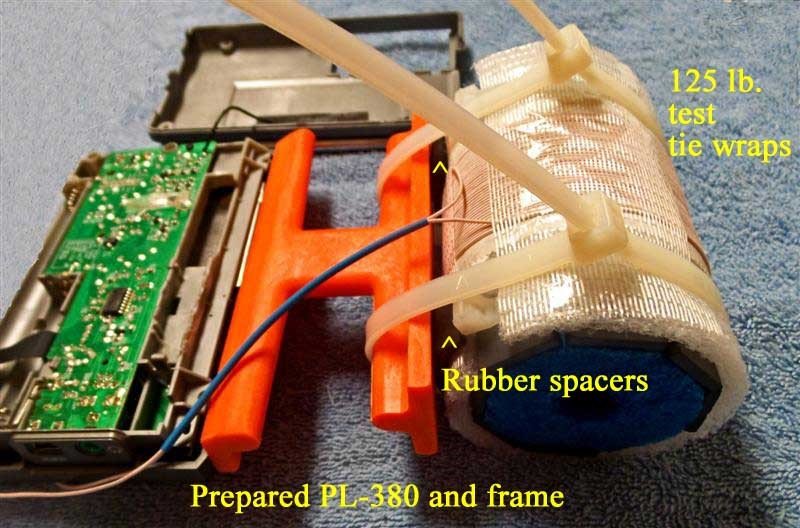
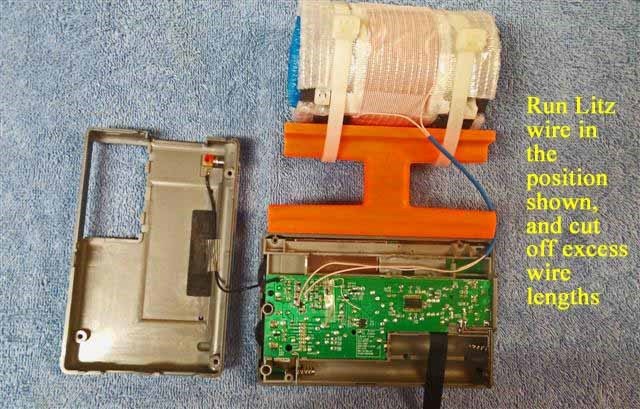
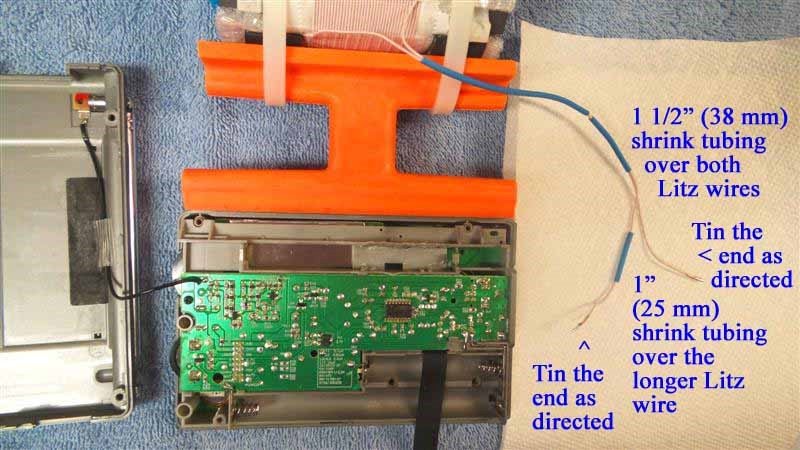
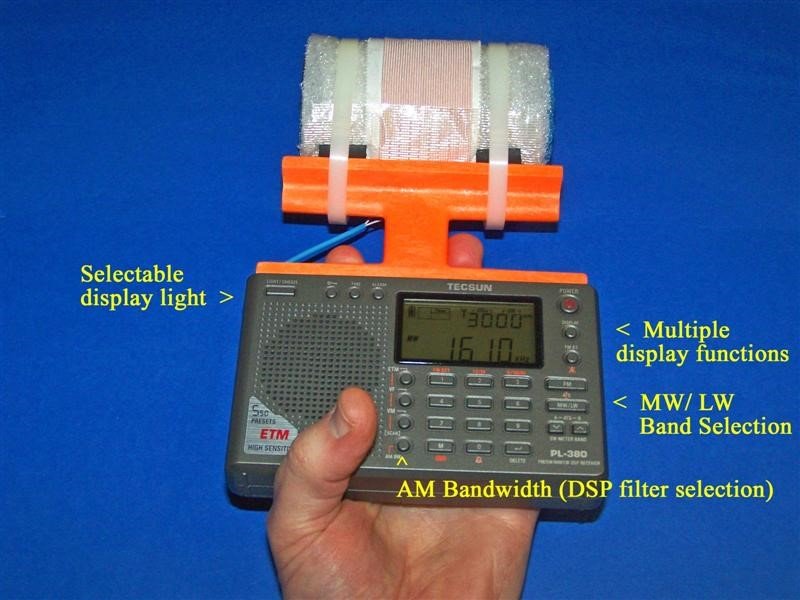
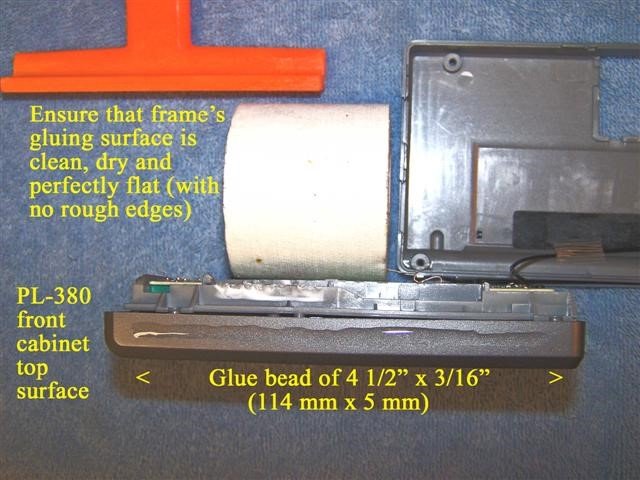
4) Refer to the photo above. After ensuring that you are fully prepared for accurate placement of the antenna frame on the PL-380 cabinet, place a 4 1/2” x 3/16” bead of super glue (114 mm x 5 mm) on the PL-380’s front top cabinet surface, as shown in the photo. Refer to the photo on the top of the next page. Ensure that the front side of the antenna frame (as shown) is facing you, then place the antenna frame in a centered position flat against the PL-380 cabinet, with its front edge lining up with the front beveled edge of the cabinet, as shown in the photo. Press the antenna frame down firmly against the cabinet for about one minute, scraping away any excess glue from the front and back edges with a small, flat jeweler’s screwdriver. It is especially important to remove any excess glue from the back edge of the antenna frame in order to allow the PL-380’s back cabinet to close normally. After completion of this step place the PL-380 (with the attached antenna frame) in a secure area until the FSL antenna is constructed.Tecsun-PL-380-FSL-7

CONSTRUCTION OF FSL ANTENNA

Tecsun-PL-380-FSL-8

5)   Refer to the photo above. Ensure that the end edges of the 4” Funnoodle inner foam core are perfectly straight before performing this step. Place the inner foam core flat on a table, standing on one of its edges as shown. Take the roll of 1” wide waterproof tape and wrap two turns tightly around the inner foam core as shown in the photo, with the adhesive side out. Ensure that the two turns are wound tight enough so that they will not slide up or down the inner foam core. Take the first 100mm ferrite bar and press it firmly against the waterproof tape with its short edge completely flat on the table, and long edges completely parallel to the edges of the inner foam core (as shown). It is important to place this first bar accurately, in order to start an accurate pattern for the set of 8 bars.

Tecsun-PL-380-FSL-9

6)   Refer to the photo above. Press another of the 100mm ferrite bars against the waterproof tape in a position where it is perfectly flat on the table and perfectly parallel with the first bar, with 1/8” (3 mm) spacing between the bars. Continue to place the other 6 bars on the inner foam core in exactly the same way, ensuring that all 8 bars are flat against the table and parallel with each other, having 1/8” (3 mm) spacing between them. If necessary (after placing all 8 bars on the tape), even out the spacing by moving certain bars slightly so that the gaps between them are all equal. The set of 8 bars will be compressed in the next step to form an octagonal pattern.

Tecsun-PL-380-FSL-10

7)  Refer to the photo above. Place a 75 lb. test plastic tie wrap around one edge of the set of 8 bars as shown, 1/2” (12 mm) from the ends of the bars. Slowly and carefully compress the set of 8 bars as shown, tightening up the slack in the plastic tie wrap gradually as you compress the set of bars. Continue this gradual process until the set of 8 bars forms an octagonal (stop sign) pattern, with the bars barely touching each other on their compressed edges.  At this point take up any remaining slack in the plastic tie wrap, and stop compressing the bars. Repeat this process on the other side of the ferrite bars with another 75 lb. test plastic tie wrap, ensuring that the bars form another octagonal pattern, with their compressed edges barely touching each other. Again take up the slack in the plastic tie wrap, and then use diagonal cutters to trim the excess ends of the plastic tie wraps.

Tecsun-PL-380-FSL-11

8)   Refer to the photo above. Place the prepared set of 8 bars flat on the table on one of its ends, as shown. Take the roll of 1” waterproof tape and tightly wrap two turns of tape around the ferrite bars as shown, with the adhesive side out. Space these two wraps evenly as shown, ensuring that they are tight enough not to slide up and down the bars.

Tecsun-PL-380-FSL-12

9)   Refer to the photo above. Take the Oatey 4” foam pack, remove the center staple and locate a 9” (23 cm) long length of this foam which is free of any holes or imperfections. At the beginning of this 9” (23 cm) long length of foam cut a perfectly straight line perpendicular to the edges of the foam. Press this straight edge of foam down tightly against the waterproof tape as shown, with the edges of the 4” Oatey form lining up with the edges of the bar assembly’s inner foam core. Wrap this Oatey foam tightly around the waterproof tape until the foam touches the plastic tie wrap clamps.

If necessary, re-wrap the foam tightly so that it is centered on the ferrite bar assembly.

Tecsun-PL-380-FSL-13
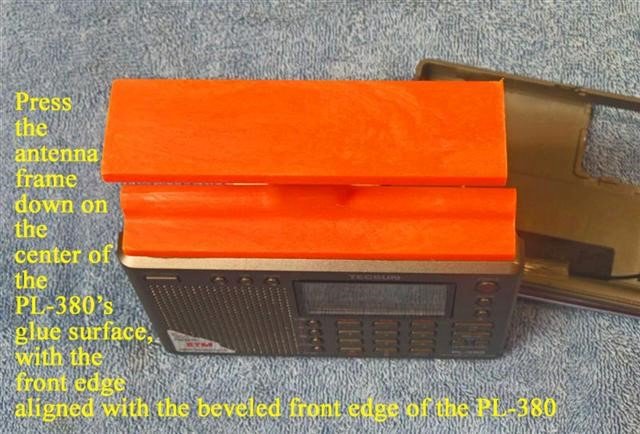
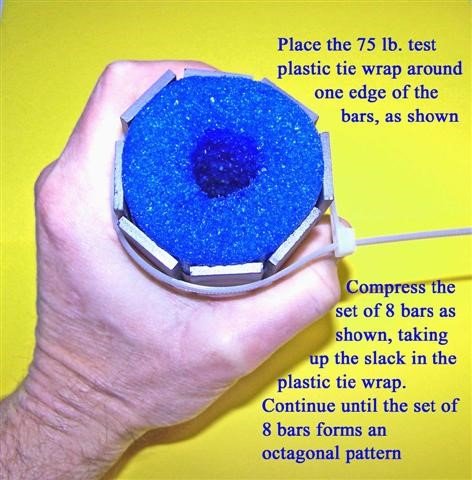
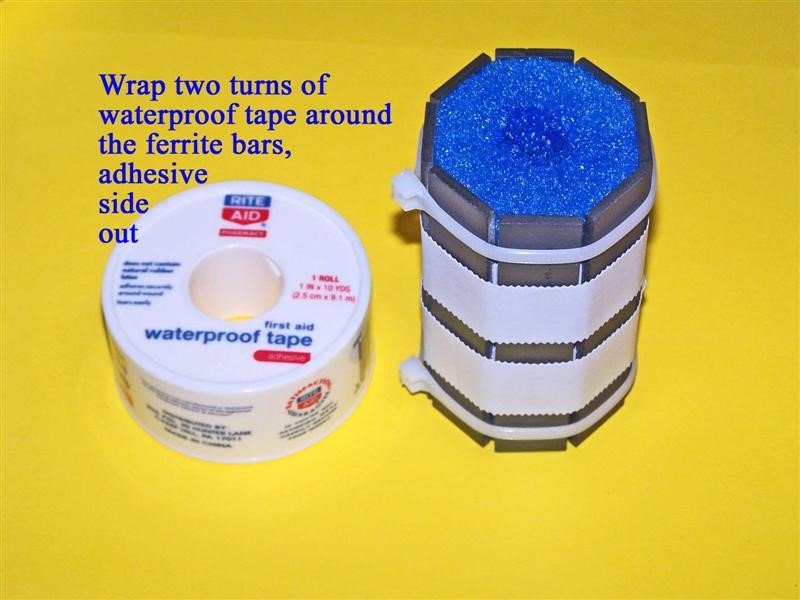
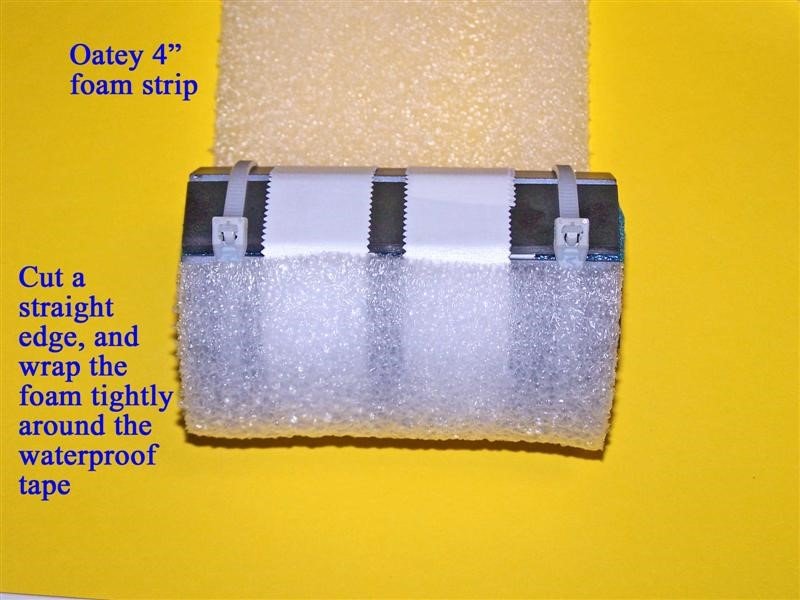
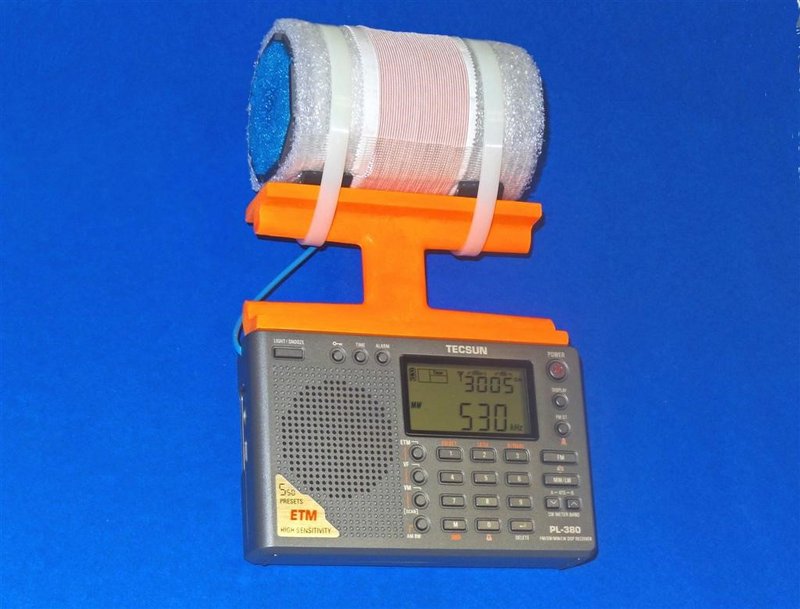
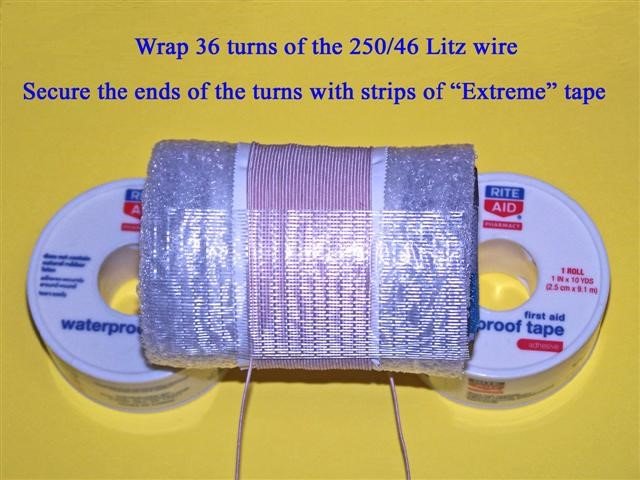
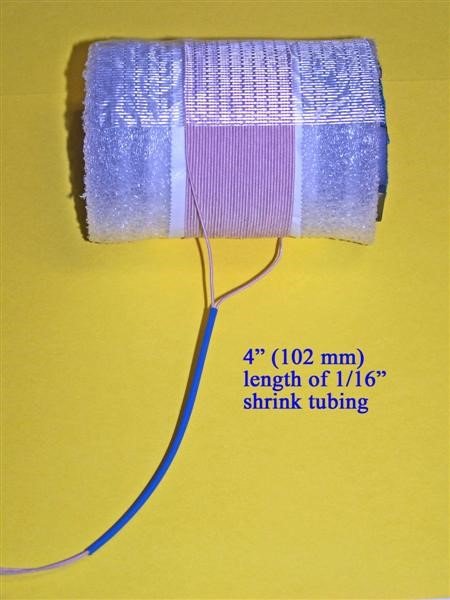
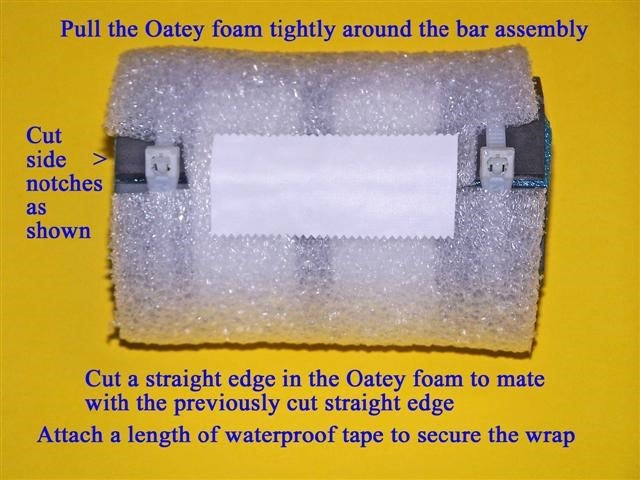
10)   Refer to the photo above. Pull the Oatey foam wrap tightly around the bar assembly, then cut a straight edge to mate evenly with the previously cut straight edge. Before pressing this edge down on the tape cut side notches in the foam where the tie wraps clamps are located, as shown. The press this foam edge tightly down on the tape, mating evenly with the previously cut foam edge. Ensure that there are no gaps or overlaps in the foam edges; if necessary, pull the foam wrap once again all around the bar assembly and cut a new straight edge that will mate evenly, with no gaps or overlaps. Finally, secure this newly cut foam edge with a 2 1/2” (64 mm) strip of waterproof tape, as shown.

Tecsun-PL-380-FSL-14

11)   Refer to the photo above. Support the edges of the prepared bar assembly so that it will be raised off of the table. Wrap two turns of the 1” waterproof tape tightly around the center of the prepared bar assembly, adhesive side out (as shown). When wrapping the second turn, ensure that the inner zigzag edge of the waterproof tape mates evenly with the inner zigzag edge of the first turn of tape, with no overlap or gap.

Tecsun-PL-380-FSL-15

12)   Refer to the photo above. Take your reel of 250/46 Litz wire and measure off 16” (41 cm) of wire from the end. Press this exact point down on the waterproof tape 1/8” (3 mm) from the left edge of the waterproof tape, as shown in the photo. While pressing down this Litz wire point while the wire is in a position parallel to the waterproof tape (as shown) pick up the bar assembly with one hand and the Litz wire reel with the other hand, pulling the Litz wire tightly around the circumference of the bar assembly in a straight, parallel manner to begin the first Litz wire turn. Ensure that this first turn stays 1/8” (3 mm) away from the left edge of the waterproof tape all around the bar assembly, then start the second turn directly adjacent to the first turn, ensuring that no gaps or crossovers occur while winding the turns. Carefully continue this process until 36 total turns have been wound around the bar assembly, which should leave the Litz wire coil in a centered position, similar to the photo below.  NOTE: This coil is designed to provide an inductance of 350 uH.

Tecsun-PL-380-FSL-16

13)   Refer to the photo above. After 36 turns have been wound on the bar assembly, ensure that there is still a 16” (41 cm) length of loose Litz wire leading up to the first coil turn. Then place a strip of Scotch “Extreme” tape along the length of the bar assembly, with the lower edge of the tape along the point where the first Litz wire turn begins (as shown), and with the tie wrap clamps in back of the assembly. Press the tape down firmly to lock the coil into place. In the same manner, turn the bar assembly over and place another strip of “Extreme” tape along the bar assembly, with the lower edge of the tape along the point where the last Litz wire turn ends (where the wire leaves the coil), avoiding the tie wrap clamps. There should be about 2” (51 mm) of space between the two “Extreme” tape strips, and both loose Litz wire ends should be parallel as they come off of the coil. Press the second “Extreme” tape strip down firmly to lock the coil into place. Finally, measure off another 16” (41 cm) of loose Litz wire from the coil, cutting the Litz wire at that point.

Tecsun-PL-380-FSL-17

14)   Refer to the photo above. Cut a 4” (102 mm) length of the 1/16” shrink tubing, and then cut a very short piece off of the ends of the Litz wires to ensure that these ends have the smallest and smoothest possible profile to be run through the shrink tubing. Run one end of the Litz wires through the shrink tubing until about 3 inches of wire extend from the tubing. Carefully insert the other end of the Litz wire through the shrink tubing, and use the procedure (and photo) in Step 30 of the Loopstick Transplant article to run the second Litz wire through the shrink tubing, as shown. The related photo for that procedure is included below.

Tecsun-PL-380-FSL-18


Tecsun-PL-380-FSL-19

15)  Place the previously prepared PL-380 and antenna frame assembly flat on the table, with a protective cloth to keep the front panel display from damage.

Take the prepared FSL antenna assembly and place it in the position shown, with the Litz wire shrink tubing running along the back side of the antenna frame and the lower edge of the FSL assembly next to the top of the antenna frame. Place the two 3/4” x 1” strips of rubber heater hose in the two positions shown, in between the antenna frame and the FSL antenna and also in between the coil and the FSL edges, with the longer rubber strip dimensions parallel to the FSL edges. Start the two 175 lb. test plastic tie wraps in the positions shown (down the center of the rubber spacer strips), ensuring that the rubber spacer strips remain between the FSL assembly and the antenna frame, and that the spacer strips are centered at the very bottom of the FSL assembly. Also ensure that the Litz wires are in the position shown, with no pinching or binding between the FSL assembly and antenna frame. Slowly and carefully tighten the first plastic tie wrap while ensuring that the rubber spacer strip remains in the proper position. Tighten this plastic tie wrap only enough to securely hold the FSL assembly, and do not tighten it to the point where the ferrite bars’ octagonal pattern begins to distort. In a similar manner, carefully tighten the other plastic tie wrap while ensuring that the rubber spacer strip remains in the centered position, in between the antenna frame and FSL assembly. Once again, tighten this tie wrap only enough to securely hold the FSL assembly, and not to the point where the ferrite bars’ octagonal pattern begins to distort. When this process is complete the large plastic tie wraps’ clamps should be in the position shown, lined up with each other and in a position to support the radio/FSL combination when the model is laying down flat, on a table. Cut off the excess tie wrap lengths.

Tecsun-PL-380-FSL-20

16)   Refer to the photo above. Temporarily place the Litz wires down along the radio’s circuit board in the position shown. Locate the detailed circuit board antenna connection points “AN1” and “AN2” in the close up photo at the top of the next page. After locating these two circuit board connection points (with the Litz wires running in the position shown in the photo at left) place one of the Litz wires over the “AN1” circuit board point, and the other Litz wire over the “AN2” circuit board point. Then measure out about 1” (25 mm) extra

Litz wire past these two circuit board connection points, and after making sure that the Litz  wires are still in the approximate position shown in the photo at the beginning of this step, cut one (shorter) Litz wire 1” (25 mm) past the “AN2” circuit board point, and one (longer) Litz wire 1” (25 mm) past the “AN1” circuit board point.

Tecsun-PL-380-FSL-21

17) Refer to the photo below. Temporarily place the Litz wires outside of the radio as shown, and install a 1 1/2” (38 mm) long section of shrink tubing over both Litz wires, and a 1” (25 mm) long section of shrink tubing over the longer Litz wire. Position both sections of shrink tubing as shown in the photo below.  Place some type of protective material under the Litz wire so that the soldering procedure (in the next step) will not damage your work surface.

NOTE: The proper procedure of tinning the ends of the Litz wires requires that all of the individual Litz wire strands be soldered together at the ends. This requires a clean, shiny solder connection all around the circumference of the Litz wire ends for at least 1/8” (3 mm). When preparing the ends of the Litz wires in the next step, ensure that the ends are tinned in this manner before continuing.

Tecsun-PL-380-FSL-22

18)   Refer to the photo above. Carefully tin the ends of both Litz wires in the manner described above, working around the circumference of the Litz wire ends with a clean soldering iron for at least 1/4” (6 mm). After doing this, cut off the tinned section on both ends to a length of 1/8” (3 mm). When viewing the ends of the Litz wires after tinning, the entire 1/8” (3 mm) length should be bright and shiny all around its circumference, as shown in the photo at the top of the next page. The cut surface of the Litz wire (the circular face) should also be bright and shiny, with one solid surface of melted solder.

Tecsun-PL-380-FSL-23

19)   Refer to the photo above. Take the prepared ends of the Litz wires and route them as shown in the photo above, with the 1 1/2” (38 mm) section of shrink tubing placed in the cabinet clamp as shown, and the end of the 4” (102  mm) section of shrink tubing (coming from the FSL coil) also positioned as shown (where it will be run through the empty wrist strap hole, in the back cabinet side panel). Before placing the 1 1/2” (38 mm) long section of shrink tubing in the cabinet clamp refer to the picture at the top of the next page, and ensure that there will be sufficient slack in the 4” (102 mm) shrink tubing to be run from the FSL coil to the wrist strap hole (3/8” or 9 mm down from the top of the cabinet) without binding.

Ensure that the circuit board points “AN1” and “AN2” still have a small amount of melted solder on them (after removal of the PL-380 stock loopstick, as described in the Loopstick transplant article). Also ensure that there is no excessive length in either of the Litz wires, since these both must be positioned as shown (if necessary, cut one or both to the proper length, and re-tin them as described in the previous step). Place the end of the shorter Litz wire (going to the AN2 circuit board point) down in a horizontal position as shown, and using a MINIMUM of heat (and no additional solder), solder the pre-tinned Litz wire end to the AN2 circuit board point while the wire is in a horizontal position. Carefully observe the connection to ensure that there are no solder bridges to the adjacent circuit board components. After ensuring this, temporarily move the 1” (25 mm) section of shrink tubing away from the end of the longer Litz wire, and following the detailed procedure described for the AN2 connection above, carefully solder the end of the longer Litz wire to the AN1 circuit board point in a horizontal position as shown, using a MINIMUM of heat (and no additional solder). Once again ensure that there are no solder bridges to adjacent components, and that the wire is in a horizontal position, as shown. Then slide the 1” section of shrink tubing down over the Litz wire to the position shown in the photo.

Tecsun-PL-380-FSL-24

20)   Refer to the photo above. After ensuring that your Litz wire connections and the wires’ positions resemble those in the previous photo, take the PL-380’s back cabinet section and carefully bring it close to the radio, as shown in the photo. Ensure that the whip antenna’s lead-in wire is not pinched, and also ensure that the 4” (102 mm) section of shrink tubing is routed is a position close to the empty wrist strap hole in the back cabinet, as shown. As a first step, carefully mate the radio’s back cabinet to the radio’s right side (the one opposite the wrist strap hole) while continuing to guide the shrink tubing through the wrist strap hole. Finally, center the shrink tubing in the wrist strap hole while mating the remaining (left) side of the cabinets together. Ensure that the shrink tubing is not pinched or extremely tight as it is clamped down in this hole. While holding the two cabinet sides together move the whip antenna up and away from the cabinet screw hole underneath, and insert the first cabinet screw, tightening it temporarily to keep the shrink tubing in position. Then insert and tighten the left upper and left lower cabinet screws thoroughly, while snapping the right lower cabinet sections together. Finally, after ensuring that the Litz wires’ shrink tubing is still in the center of the wrist strap hole without any binding or excessive stress, tighten the final cabinet screw near the whip antenna base. Reinstall the two small battery compartment screws and reinsert batteries.

INITIAL TESTING   If you are not familiar with the PL-380, make sure that you study the owner’s manual to find the location of basic operating controls. It is important to initially test the radio in a location free of computer noise or other RF pollution—preferably in an outdoor location where its capabilities can be appreciated. Refer to the photo on the next page. Turn on the radio and select the Medium Wave band (530-1700 kHz in North America) and set the AM bandwidth control to the most selective (1 kHz) position (NOTE: This position also provides maximum MW and LW sensitivity for the model, although the higher audio frequencies are limited somewhat by the sharp DSP filtering). If your FSL antenna transplant is working properly you should notice an EXCEPTIONAL increase in the signal strength of weak fringe stations relative to the stock PL-380 model, and a very significant increase in fringe station strength relative to a 7.5” loopstick PL-380 model. Check fringe station strength across the band, and you should notice MW reception far superior to that of any stock portable in your collection. If you are not receiving any MW signals the problem is usually easy to trace—either one of the PL-380 circuit board connections is shorted to adjacent components because of too much solder, or the physical stress on the Litz wires (because they were not soldered in a horizontal position) has caused the circuit board connections to break off and separate from the board. In the first case you can attempt to remove excess solder by turning the circuit board upside down and melting the excess solder onto the tip of your soldering iron (or using a “solder sucker” in a normal position), but in the second case you will probably need a technician to restore proper function to your radio. Fortunately both of these problems are rare, and can be entirely avoided by carefully following the instructions in Steps 18 and 19.

Tecsun-PL-380-FSL-25

OPERATION

The triple advantage of superior FSL sensitivity, powerful audio amplification and sharp DSP selectivity provide this breakthrough model with exceptional weak-signal performance for a portable—to the extent that after a few DXing sessions the operator may have the impression that the realm of science fiction has been approached. The cylindrical shape of the FSL antenna seems to provide a bonus capability of unusual nulling function as well, so that multiple weak signals can be received adjacent to (or on the same frequencies as) local pests.

During DXing sessions it is a good idea to support both the PL-380 and FSL antenna frame in the same hand (as shown in the photo above), and also to avoid sudden mechanical stress or bumps to the antenna frame. When constructed according to this article the glue bond between the antenna frame and PL-380 is sufficient for routine operations, but the DXer should exercise care to avoid bumps, drops or other stress. The FSL antenna itself is fairly rugged, as constructed.

Refer to the photo on the previous page. The PL-380 has many digital search functions and advanced capabilities for a pocket radio, but some of the functions of particular interest to the transoceanic DXer are described here.  The “AM Bandwidth” switch allows you to choose different levels of DSP filtering to limit splatter from domestic pests, and is usually left in the 1 kHz position for the narrowest filtering while chasing transoceanic DX (although this position does cut off some of the high frequency audio from the desired DX station). The 9/10 kHz switch allows you to change the tuning steps of the radio from the North American (10 kHz) band system to those of the European/ African/ Asian/ Pacific band system (9 kHz), depending upon your preferred DX targets. The MW / LW switch allows you to switch over to Longwave DXing—and you will be pleasantly surprised to discover that your newly installed 3” Bar FSL antenna is FAR more sensitive on the Longwave band than the stock PL-380 loopstick. Finally, the Display switch offers you multiple options while chasing transoceanic DX—you can have a 24 hour clock display,  a display of the alarm time set in the radio, a constantly changing readout of DX signal strength and S/N ratio, or a temperature display (in either Celsius or Fahrenheit).

Because the antenna frame has been trimmed to allow full operation of the PL-380’s whip antenna to receive SW and FM signals, it’s possible to check the Shortwave parallels of Medium Wave DX stations (and switch back and forth) within a couple of seconds. In general, this “science fiction” PL-380 model’s sensitivity and selectivity will allow you to experience the most exciting AM-DXing fun that a portable can offer—and do so at an unbeatable price.

This hard-wired FSL-enhanced PL-380 model is the first in a series of portables designed to be the ultimate “travel radios,” with DXing potential superior to any stock design. It has been a great thrill to design, construct and introduce this model, which is pretty fanatical in both its appearance and DXing capabilities. My hope is that its function will inspire those who build and use it, and help them share my impression that the MW-DXing hobby has a very innovative and exciting future!

73 and Good DX,

Gary DeBock


Gary, I can only imagine the time and patience it took to document this procedure. Once again, thank you so much for doing so! I have a Tecsun PL-380 and I will–some day–make this “science fiction” mod! 


Ron approves of the high-gain ferrite bar antenna

$
0
0

Ferrite-Bar-PL-365In response to our post about the high-gain ferrite bar antenna for the Tecsun PL-360/PL-365 and CountyComm GP5/DSP and GP5/SSB, SWLing Post contributor, Ron, writes:

…and it’s worth it.

On MW there is a marked difference on both the low and high ends
of the band, just as the builder said, compared to the stock plugin antenna.

On longwave my local NDB BH went from being barely audible on the stock
plugin to being quite readable–well above the noise.

The seller replied to a question about it being shipped very quickly
since it never did track on USPS.

Good seller, reliable email, good antenna that works as claimed–no problem here.

Click here to view the antenna on eBay.

Thank you so much for the report, Ron!

eBay find: Acoustical Manufacturing of England

$
0
0

Acoustical Mfg England - AM Tuner

Many thanks to SWLing Post contributor, David Korchin (K2WNW), who writes:

I remember when I was a young kid back in Saskatoon, being invited over to a friend’s house to hear his “English stereo.”

We both worked at the CFMC-FM radio back then (he did the 10 PM-2AM slot, and I worked overnights). He being a little older, wise, cooler, than me, I jumped at the chance to browse his vinyl collection, read through his punk magazines and generally look to have his coolness rub off on me.

It was the first time I heard a Quad stereo system. He had the pre-amp, amp, and FM tuner (I think he might have had a Technics turntable, and a pair of Klipsch speakers). I remember being awestruck by the warm sound and the precise imaging of the system. Tracks that I thought I knew intimately took on new dimension. I wanted that system!—and I still don’t have it.

But I’ve noticed a few pieces on eBay, and I wondered if you’ve heard of them, too?

http://ebay.to/1n90DYm

Surprisingly, Acoustical made MW and SW tuners, too!

Acoustical Mfg England Shortwave

http://ebay.to/1PxLSEP

Here’s an early FM example: 

Acoustical Mfg England FM Tuner

http://ebay.to/1n915Wz

And a later one, that I think I saw at his house: 

Acoustical Mfg England FM TunerII

http://ebay.to/1OoIQoJ

These are all tube rigs, OM! And if nostalgia carries any weight, they are worth checking in to.

Many thanks for the links and trip down memory lane, David!

Some of you may know that David is my ultimate radio enabler; my savings account nemesis! :-)  
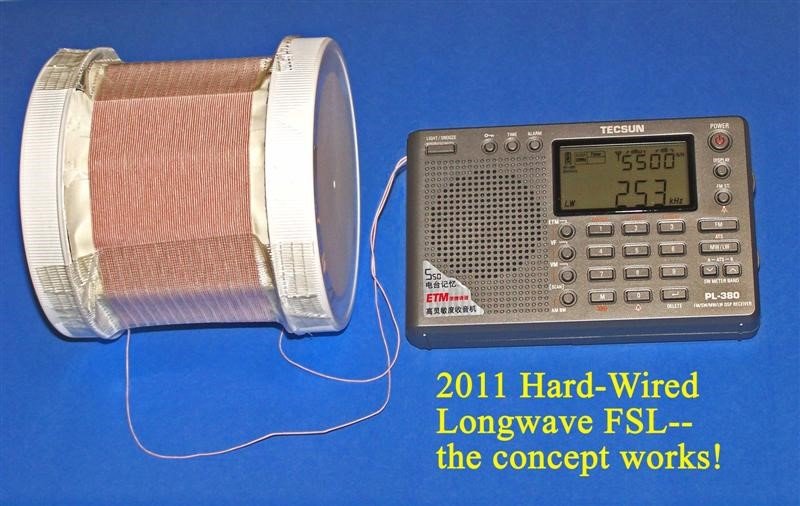
He about got me this time, too. I almost pulled the trigger on that Acoustical Manufacturing Shortwave Tuner. It is a beauty indeed!  Though not tested (and one would assume it could use some new caps), it does look very clean and I bet it performs like a charm.

Still, I’ll pass this time. I recently dipped heavily into my radio savings so I need to allow a little time for the account to build up again!

I’m curious if other SWLing Post readers are familiar with Acoustical Manufacturing products? Please comment!

Viewing all 825 articles
Browse latest View live